605+ Cannabis Strains over 20 Breeders worldwide.

Toll Free: +1 (800) 805-7835

Diagnosing and Fixing Cannabis Leaf Symptoms

Do your cannabis plants look unwell? Do you notice some cannabis leaf symptoms and are afraid there could be something worse? Here is a list of some of the common leaf symptoms in cannabis plants and their treatments. 

Some Important Cannabis Leaf Symptoms, Diagnosis, and Treatments

Boron Deficiency

This is a rare deficiency that causes your plants to grow slowly and sometimes grow abnormal plant parts. Leaf symptoms are

  • Pale color of leaves
  • Purple or darker leaves
  • The presence of dark brown spots
  • Leaf edges are browning or look brunt

Avoid the use of severely-filtered water. Use boron supplements or fertilizers rich in boron.

Copper Deficiency

Copper deficiency can lead to poor plant growth, poor ripening of the buds and may affect the younger as well as older leaves. Cannabis leaf symptoms are:

  • Dark and twisted leaves
  • Purple or bluish undertones
  • Leaves that shine like metal
  • Curling under of leaves
  • Leaves tips are white or yellow

There are also weak stems, limp leaves, immature leaf growth, and lack of buds. Treat copper deficiencies by improving pH in soil and using a fertilizer that has good copper amounts.

Calcium deficiency

Calcium deficiency can lead to very poor growth; weak plant parts sand poor flower and bud growth, and development. Calcium is a very important mineral, and lack or reduced amounts in plants can lead to root problems and very weak plants that won’t survive the heat.

  • Darkening leaves
  • Necrotic spots on leaves, huge light brown spots
  • Presence of molting and spotting
  • There are tiny and distorted leaves
  • Curling in of the tips of the leaves
  • Dying leaves

Other symptoms include stunted growth,  crinkling and discoloration of young growths, very weak branches, hollowing or decaying stems and weak and poorly developed roots. To treat calcium deficiencies, use CAL MAG, a popular and effective treatment that can stop calcium and magnesium deficiencies.  Correcting soil pH is also important since poor pH can affect the way calcium and other minerals are absorbed.

Iron Deficiencies

Iron is important to plants despite being a trace nutrient. When a plant lacks iron, it cannot produce its food. It cannot produce new leaves. 

  • Chlorosis – young leaves turn to pale yellow while the veins are green. The symptoms affect the newest growth.
  • Late symptoms include young leaves turning brighter 
  • The yellowing will occur in all leaves in late stages

To treat iron deficiencies, check the pH of the soil and roots. Fix pH problems and add iron supplements or use fertilizers that have higher amounts of iron.

Manganese Deficiency

Manganese is needed by plants to create enzymes necessary for producing food and for growth. Manganese deficiencies are very rare, and mostly, it’s related to deficiencies in iron and zinc. The following leaf symptoms are expected:

  • Pale leaves
  • New leaves start to become yellow
  • Older leaves or leaves at the lower parts are also yellowing 
  • Veins of leaves remain green
  • Presence of brown spots
  • There is a patchy pattern or speckles
  • New leaves are damaged, soon, lower leaves become damaged
  • Less growth and sometimes unusual growth

Plants will have very slow growth. Treatment includes correcting pH problems and using iron supplements or fertilizers rich in iron.

Molybdenum Deficiencies

Molybdenum is a rare element but is needed in trace amounts to support plant growth and development. Lack of molybdenum can result in:

  • Yellowing of older leaves
  • Spotted leaves 
  • Leaf edges turning orange, pink or red
  • Changes in color may move towards the middle of the leaves

Correct pH problems as soon as you notice molybdenum problems. Also, look for fertilizers and supplements that contain more molybdenum to replace the product you were using before. 

Nitrogen Deficiencies

Nitrogen is one of the essential nutrients needed for proper plant growth and development. It is the main macronutrient needed during the vegetative stage, and lack or reduced nitrogen intake can lead to poor growth, weak plants, and poor flower production. Some symptoms include:

  • Pale or yellow leaves
  • Veins are green yellowing in between the veins
  • Older leaves are affected/damaged
  • Old leaves may wilt and fall off

Cure nitrogen deficiency by improving soil pH and using nutrients with high nitrogen amounts. Correct this deficiency ASAP to avoid growing and flowering problems. 

Phosphorus Deficiency

In phosphorus deficiency, plants will have poor flowering performance. Your plants won’t be able to grow well and may affect your yields. 

  • Dark green, gray and blue leaves affecting older leaves
  • Spots and thickening of the lower leaves
  • Yellowing of leaves where there are no spots
  • Leaves curling or twisting
  • Leaf tips burning or dying 
  • Old leaves fall off

Other symptoms of phosphorus deficiency include discoloration of the stems, stunted plant growth, slower growth, poor bud development, the presence of root rot, mold, root disease, and underdeveloped seeds in female plants. Treat phosphorus deficiencies with correct fertilizers used in the flowering stage. Use organic fertilizers that contain high amounts of phosphorus. Correct root or soil pH to allow the absorption of phosphorus and other minerals.

Potassium Deficiencies

Potassium is necessary for the flowering stage as this helps plants form large and dense buds. It’s also needed during the vegetative phase but in smaller amounts only. Potassium deficiency leaf symptoms are the following:

  • Leaf edges and tips turning brown or looking burnt
  • Leaves pale
  • Older leaves yellowing
  • Leaves with dark and brown spots

Lack of potassium also results in slowed or stunted growth, twisted or abnormal plant growth, curling over or under of the leaves, very tall plants or too stretchy plants, and poorly formed buds. Correct potassium deficiency by using fertilizers that are made for the flowering stage. Also, check and correct soil and root pH to promote the absorption of nutrients. Use organic fertilizers with high amounts of potassium.

Sulfur Deficiency

Sulfur is abundant in soil, and thus, deficiencies occur in plants grown in hydro. This element can help promote plant health and overall development. Lack of sulfur will result in these leaf symptoms:

  • Pale leaves, yellow new leaves
  • Red or color pink on leaves
  • Upper leaves and new leaves are abnormal or damaged
  • Older leaves are also damaged
  • Reduced growth

Sulfur deficiency also results in fluffy or airy buds, poor growth, and slow growth. Cure sulfur deficiencies with fertilizers and supplements high in sulfur. Correct pH ASAP to avoid complications.

Zinc Deficiencies

Zinc is needed in the growth of new leaves, in proper plant development and the formation of large and dense buds. Zinc deficiencies go hand in hand with iron and magnesium deficiencies. The following can be seen in plants that lack zinc:

  • Yellowing of leaves
  • Specks and irregular patterns on leaves
  • Upper and new leaves are damaged
  • Burnt tips, dying tips
  • Curling under of leaves

You will also notice poor growth, non-vertical growth, and other abnormalities in bud formation in plants that lack zinc. To treat zinc deficiencies, use zinc supplements. Correct iron and magnesium deficiencies as well because these affect zinc absorption.

Leaf Septoria

These are yellow spots on leaves caused by the fungus Septoria cannabis and the S. neocannabina species. These opportunistic creatures attack during rain and warm weather and are common in marijuana grown outdoors. 

  • White or grayish-white, yellow marks or spots on leaves
  • Presence of circular lesions on the lower leaves
  • A pimple-like bump on leaves
  • Leaves may dry and just fall off 

It can be hard to treat septoria, but you can use helpful plant-bacteria such as Bacillus pumilis or Trichoderma that can remove the fungus in the soil. Prevent this from happening by prepping the soil before you grow your plants.  

Powdery-White Mildew 

This is a very common fungus that can affect your plants, especially during the flowering stage. It’s hard to treat PWM, and thus, most growers harvest early to save their buds. 

  • Presence of white material on leaves
  • Will spread on all the parts of the plant, including the buds in just a short amount of time. 

Harvest early, but if you can’t use homemade treatments like spraying a solution of water and liquid soap or water and baking soda plus vegetable oil. Spray these on your plants, even parts that are not affected. Use tissue paper to lift the mold from the leaves. Discard the tissue right after to prevent the spread.  

It’s better to prevent PWM than treating it. Be mindful of the humidity inside your growing area. Make sure to reduce humidity and control moisture inside the room to prevent mold and mildew growth. Grow only a few plants and avoid plants touching each other inside the room. 

Fusarium 

Fusarium targets the leaves and the roots of cannabis plants. This is a type of fungus that lays dormant in tropical soil and can be activated in the right conditions. This is often spread through the use of fusarium-infested tools and running water. Signs are

  • Leaf wilting; color from green – yellow-brown in just a few days.
  • Tips of wilted leaves are curling upwards
  • Leaves appear to drop off but are still on the plant

Use fungicides that can kill fusarium. However, this pesky fungus is very difficult to kill and will usually persist even after you have applied fungicides. You may also apply hydrogen peroxide to the soil to clean and disinfect it. The best way to deal with fusarium is prevention.

Prevent fusarium by using clean and sterile garden tools and equipment. Use good quality soil. Never reuse soil with fusarium.

Verticillium Wilt

This is another fungus problem that is common in cannabis plants. This happens in improperly drained, rich soil. Signs of Verticillium wilt are:

  • Yellowing older leaves
  • Yellowing is seen in between the veins and along the outside edges of the leaves
  • Leaves turn grayish-brown especially leaves found on the base or near the soil

There is no effective way to treat verticillium wilt. The only way to save your plants is through prevention. Use clean and healthy soil or grow your plants in hydro to completely prevent this condition. Use clean and sterilized garden tools and equipment. 

Damping Off

When seedlings and seeds are attacked by fungi in the soil, the young plants may simply topple over and will soon die. This is a condition known as damping off. Symptoms include

  • Death of the plant
  • Lesions in the stems
  • Cankers between the nodes
  • Plant falling over or wilting
  • Lesions on the upper portion of the plant

There is nothing you can do with damping-off, but you can prevent this by growing in healthy soil.

 You may also germinate seeds in peat cubes and transfer to a better growing medium like hydroponics. Use seeds with strong genetics to avoid damping off. 

Hot and Humid Conditions

A small grow room or improperly monitored growing area, humidity can easily increase, and this can be fatal to your plants. This usually happens right after watering or when there are just too many plants inside the growing area. The plant leaves will exhibit the following symptoms:

  • Leaves closing 
  • Leaves are drooping

Correct humidity problems right away. For a room with high humidity, improve conditions by using a fan or opening a window or door. Let clean, fresh air enter to remove moisture. Use a small fan and place on the floor to reduce moisture and prevent mold growth.  Take note that molds and mildew develop in very humid environments.

Underwatering/overwatering

If your leaves are drooping or your plants look unwell, you may suspect overwatering or underwatering. Correct these conditions right away. If the soil is too dry, water your plants ASAP. 

If the soil is moist or wet and yet the plant is drooping, use a fan to dry it out. Remember to water only when the soil is dry and never when it’s moist and wet.

There may be more cannabis leaf symptoms; nevertheless, always monitor your plants and be on the lookout for any problems. Correct problems right away to prevent anything that can interrupt your plants’ growth and bud development.

First Signs of Flowering Stage of the Cannabis Plant

Now that marijuana legalization is becoming more widespread, it’s never been a better time to start a growing operation. However, while growing and cultivating cannabis can be a profitable enterprise, you need to know what you’re doing before getting started. One of the most crucial stages is when the plant begins flowering. Since the buds are what everyone wants, you have to care for your plants to ensure a bountiful harvest.

So, let’s break down the core elements of this flowering stage and what you can do to facilitate better growth.

What is the Flowering Stage?

As the name suggests, this is when the cannabis plant stops growing and starts producing flowers. Both sexes can produce flowers, but males only make seeds while females make buds. If you’re trying to harvest pure cannabis for consumption, you need to remove all males from your crop. Otherwise, they can pollinate the females, leading to seeds within the buds. In this case, the buds contain much less THC and CBD, and they’re not suitable for selling to dispensaries or customers.

What are the Different Stages of a Cannabis Plant’s Growth Cycle?

There are six distinct phases of a cannabis plant’s growth cycle. Understanding and recognizing these stages allows you to harvest more potent plants, leading to better profits. Here’s a quick overview of the different phases:

Germination Phase

Seeds need water to sprout and sunlight to grow. Fortunately, because cannabis is a relatively hardy plant, you can germinate the seeds in a few different ways. For example, you can place the seeds in water, a damp paper towel, or directly into the earth. Each method has its pros and cons, so you might want to experiment a bit. Once a seedling sprouts, it’s on to the next phase.

Seedling Phase

As the seedling grows, it will start developing leaves. During this phase, you can keep the seedlings close together in fertilized soil. Once they reach the next stage, you should move each plant into individual pots or containers. Both the germination and seedling phases are pretty short, lasting a few days at most.

Growing Phase

Here is where your cannabis will undergo the most significant growth spurts. Some plants can reach up to 10 feet high, so make sure you have enough space to house them all. During this stage, the plant will develop a thick stem and various leaves and branches. Depending on the type of cannabis you’re growing (i.e., Indica vs. Sativa), the growing phase should last seven to nine weeks. Indica plants grow thick, bushy leaves, while Sativa strains are thinner and longer.

Pre-Flowering Phase

Technically, this isn’t an official stage of the plant’s life. However, it’s when you need to sex your plants so that you can remove all the males. Even if you’re trying to breed cannabis strains, it’s imperative to control every facet of the pollination process. As a rule, males have taller, thicker stalks and fewer leaves. There are a few other signs we’ll discuss later on.

You must remove all the males before the flowering stage because that’s when fertilization happens. One male can pollinate an entire crop of females, so you have to be as thorough as possible. This is one reason each plant should have its own growing container. Otherwise, it can be hard to differentiate one plant from the next.

Flowering Phase

As we mentioned, this phase is when the plant develops buds. If you’ve removed all the males, you should notice thick, sticky buds on your female plants. This stage doesn’t last too long, but keep in mind that the top half of the plant will develop faster than the bottom. This discrepancy is because the top half gets more sunlight, so the plant can devote more energy to bud production. To ensure a better harvest, we recommend cutting off the top half and letting the bottom grow for another week or two before harvesting.

Harvest Time

If you wait too long to harvest your cannabis, the THC concentration changes, leading to less than desirable results. So, you need to harvest your plants within a specific window to ensure the best crop. As a grower, you’ll learn the best time to cultivate your buds through trial and error.

Signs That Your Cannabis is Entering the Flowering Phase

We’ve already mentioned that males have fewer leaves and thicker stalks than females. Here are some other signs to watch out for when your plants enter the pre-flowering phase.

Pistils

Females grow white, wispy pistils along with their leaves. These elements are what will turn into buds. If you don’t remove the males, the pistils will get pollinated, resulting in new seed batches.

Green Sacs

Males produce these sacs at the base of their branches. The bags are what contain the pollen, so you have to be careful not to disturb them too much when removing the males. Otherwise, you might pollinate some females by accident.

No More Growth

During the growing phase, you’ll notice your plants getting taller and leafier. But, once they enter the flowering stage, all their energy goes toward making the flowers. So, they’ll stop growing altogether.

Tips for Helping Your Cannabis Grow and Flower

If you’re new to growing cannabis, you need to learn some of the best practices for getting the most buds from your plant. Here are some ways to ensure a bountiful harvest:

Prop it Up

As cannabis plants grow, they’ll get top-heavy because of the leaves and buds. When this happens, they’ll droop and potentially break. To avoid this problem, you should use wooden or metal rods to keep the plants straight. Remember that you can reuse these rods for multiple crops, so they’re a good investment.

Use the Right Fertilizers

If you’re growing indoors, you need the right soil. There are multiple types of fertilizers for cannabis plants, and each one is designed for a specific stage. So, be sure to have a schedule of when to use the right fertilizer. Otherwise, you could hurt the plant, leading to a smaller harvest.

Lower Your Humidity Levels

As the plants develop flowers, too much humidity can lead to mold growth. During the seedling and growth phases, your plants need lots of moisture to thrive. Once they enter the flowering stage, you have to reduce your levels accordingly. The specific levels depend on the strains you’re growing.

Use the Right Lighting Schedule

If you’re growing autoflowering seeds, you don’t have to worry about using the proper 12/12 lighting schedule, as the plants will automatically flower. Other seeds require this schedule to ensure appropriate development.

Get Your Cannabis Seeds From Us!

The best cannabis starts with the best seeds. We offer feminized, autoflowering, and regular cannabis seeds for your convenience. Contact us today to place an order!

Best Grow Lights for Cannabis

Many cannabis growers believe that good lighting equals better yields and they can’t be far from the truth. Those who cannot grow their cannabis plants outdoors under bountiful sunshine rely on the power of indoor grow lights. If you’re one of the many people who grow cannabis indoors, this guide will show you how to find the best grow lights for cannabis.

Light is food to plants and the intensity of your growing lights affects their growth and yield. Without proper lighting, even healthy plants will not produce much yield at all.

Three Types of Grow Lights for Marijuana Cultivation

There are a lot of grow lights that you can use to grow cannabis in an indoor setup but when you consider the basic types, there are three to consider: 

Fluorescent Growing Lights

Fluorescent grow lights are the most common grow lights for cannabis cultivation. These include compact fluorescent lights and T5 growing lights. These are very easy to find and buy from any hardware shops or cannabis growing supplies shops and are usually the most affordable. 

High-Intensity Discharge Growing Lights

High-intensity discharge (HID) grow lights are not as commonly used indoors or in homes but are often used in commercial settings or from a lamp post. This kind of lighting shines the brightest but at the same time, burns very hot. Three of the most common HID lamps are metal halide lamps or MH, ceramic metal halide lamps (CMH, LEC, or light-emitting ceramic and LEC) as well as High-Pressure Sodium or HPS. If your home is located near the road or highway, lamp posts are surely fitted with high-intensity discharge grow lights.

LED Growing Lights

LED growing lights are the latest addition to the best grow lights for the cannabis list. LED bulbs are fitted in a special lamp or receptacle and the bulbs vary in sizes, form factors, and colors. There are no standard types of LED growing lights however, some growers say that some lamps have better results than other lamps. 

LEDs are preferred by many growers because these last longer compared to ordinary CFL or HID. These shine brighter but at the same time, are cooler and won’t make your growing area too warm. LEDs may be more expensive than other grow lights but these burn brighter and will shine longer.

Other Types of Grow Lights

Induction grows lights are rare but are used by some growers claiming that these are far better than other types of grow lights. There are two kinds of induction grow lights: magnetic induction grow lights and plasma induction grow lights. 

 Magnetic induction grows lights are good for cultivating cannabis and are even mentioned as grow lights that can give you good results. Meanwhile, plasma induction grows lights don’t perform well when it comes to growing cannabis. 

There are some kinds of induction lights that are better at lighting large areas like stadiums and coliseums but are not as good as growing cannabis. Also, induction lamps are very expensive 

Other types like old-school yellow/amber light bulbs are not suited for cultivating cannabis. Also, these burn very hot and will only turn your growing area to an oven.

Comparing the Best Cannabis Growing Lights

You can choose from any of the three general types of grow lights and the best way to find the best one is to make a simple comparison. 

Fluorescent Grow Lights

Fluorescent growing lights are very popular and come in various shapes and sizes. You’ll find fluorescent bulbs in different shapes; from twisted bulbs to long and loopy ones. These also come in different tones or colors which favor people who use them in their homes. 

Aside from growing cannabis, fluorescent lights are also effective for growing different plants including herbs, vegetables, and ornamental plants. These don’t use too much electricity however, you need several of these if you have a larger grow room or you have more plants to cultivate.

CFL growing lights are odd-shaped, twisty bulbs that you can find in almost all hardware stores. CFL lamps produce different spectrums of light and are perfect for growing weed in very small or tight spaces. Most growers use CFL lamps when growing cannabis inside growing tents or cabinets. Growers make their light fixture or holder or use large gooseneck lamps so it’s easier to adjust the position of the lamps.

T5 growing lights are another readily available type of fluorescent light. This is used not just for growing cannabis but also in cultivating indoor ornamental or flowering plants, herbs, and small indoor vegetable gardens. Although not as popular as CFL lamps, T5 grow lights are more available in garden and hardware stores.

T5 lamps are wider and bigger compared to CFLs. These come in a set with a panel or hood. With this setup, you can hang this over your plants and adjust the distance between the lamp and your plants. 

Advantages of Using Fluorescent Lighting

  • Fluorescent lamps are cheap/affordable.
  • These are easy to purchase from a local home and garden supplies shop or hardware
  • These won’t use a lot of electricity unless you use several lights at once. 
  • These won’t generate a lot of heat unless you use these lights at the same time. 
  • These have a good light spectrum that benefits growing cannabis plants.
  • These are perfect for small spaces or growing areas.
  • You can keep these closer or farther from your cannabis plants

Overall, fluorescent lights are the best choice for those growing clones, newly sprouted plants, seedlings, and also very young plants. This type is also great for small growing spaces and stealth growing areas.

By using smaller lamps like these while the cannabis plants are still small, you will save a lot of money in paying electric bills during the first weeks of your plants’ lives than using HPS lamps. 

Disadvantages of Using Fluorescent Lighting

  • Your plants will have smaller yields compared to other kinds of grow lights especially during the flowering stage as the buds are forming.
  • Fluorescents can yield only 0.25 grams per watt 
  • LEDs and HPS can yield up to 1 gram per watt.
  • Light from a fluorescent lamp does not penetrate well therefore these are better suited for plants that grow flat and short. Tall plants won’t work well with fluorescent lamps, especially during the flowering stage.

Fluorescent lights are recommended for growing clones and very young plants. It can also be used as supplemental lighting to save you money during the growing phase than using HPS lamps. These are perfect for smaller spaces.

High-Intensity Discharge (HID) Growing Lights

HIDs are very efficient compared to fluorescent lights. These lamps come with very large transparent bulbs with weird shapes. Growing lamps come with large hoods with reflectors that will reflect light to your plants. Some lamps are already available with hoods while some ingenious growers make their own HID lamps with makeshift metal hoods and reflectors. 

Another very important thing about HID grows lights is that these tend to burn brightly and emit a lot of heat. This heat is bad for your plants as these can dry up moisture and will make the growing conditions inside the growing room intolerable. To augment his, exhaust fans have been integrated into lamp hoods to removing building heat.

Metal Halide Grow Lights

Another best grow light for cannabis is MH or metal halide. These are perfect for the vegetative stage because these produce blue light that growing plants need. But this light is not just for the vegetative stage but may also be used during the flowering stage up to harvest time. Cannabis growers who use metal halide lamps recommend this lamp to grow stronger and healthier vegging plants.  

High-Pressure Sodium Growing Lights

Another type of high-intensity light is the very popular high-pressure sodium grow lights. These are most commonly used during the flowering phase because these emit yellow light. This color of light helps stimulate the production of buds. 

Cannabis plants exposed to HPS lamps during the flowering stage produce better yields for every watt of electricity consumed than other growing lights. This is why this type of lamp is very popular. 

Ceramic Metal Halide and LEC Light Emitting Ceramic Growing Lights

CMH lamps and LEC lamps pertain to the same thing. CMH is a kind of metal halide bulb that makes use of ceramic as a vital part of the lamp similar to HPS lamps. This is why CMH lamps are considered to be more efficient compared to MH Lamps according to users. 

Advantages of HID Growing Lights

  • These are very efficient as these will give you higher yields for every watt.
  • These efficient bulbs are best for the flowering stage. You can get as much as 0.5 to 1 gram of yield per watt as long as all the growing and flowering needs of the plants are met. 
  • HID lamps are very straightforward to use. You can hang these from the correct distance. You don’t need to adjust the lamps all the time compared to fluorescent lamps.
  • LED lamps come in different colors. You can switch the red color for flowering and blue color for growing.
  • There are many different lamp designs to choose from. 

Disadvantages of HID Growing Lights

  • These lamps can become very hot especially for more lamps and bigger lights. 
  • You need additional fans to remove heat. Ducting also helps and these are additional things to consider for a grower. 
  • You need to think about more lamps or lighting parts. HID lamps need a fixture, a ballast, cables, and the bulbs as well as extra exhaust systems to remove heat.

For a 250 watt HID bulb, you can get as much as 1 to 2 ounces per month. For a 400 watt HID lamp, you can get as much as 1.5 to 3.5 ounces per month. For 600 watts HID, 2.5 to 5 ounces of yield per month.

HID lamps are suited for cultivating cannabis and are also very straightforward to use. If you want to get the best yields then HID lamps are the best for your growing area. 

LED Growing Lights  

LED lamps are very popular for growers and are used instead of HPS lamps. These are cooler and come with a cooling system such as fans and heat sinks. These are wall-plugged and hung over your plants. LEDs are known for their easy light penetration and thus these don’t need to be moved regularly.

Advantages of Using an LED Growing Lamp

  • This kind of lamp comes with a cooling system that will remove heat from the lamp. 
  • LED lamps are cooler and may not need any vents at all.
  • LED lamps are available in different sizes. Small LEDs may be plugged into a wall outlet and hung over the plants. Just plug and grow.
  • According to some growers, LED lamps can grow buds with more resin. They combine two grow lights: an LED and HPS to get good yields and improved resin production.

Disadvantages of Using an LEDGrowing Lamp

  • Larger and more powerful LEDs require venting or a proper ventilation system using fans and heat sinks. 
  • LEDs will give you smaller yield amounts compared to HPS according to some growers. But there is still a lot of studies to be done to prove this. 
  • You must provide a larger space between your lamp and plants to get the best outcome. Small LED panels should be around 18” or higher from your plants during the middle of the flowering stage to prevent burning buds. Bigger LEDs should be kept 30” or higher.

Conclusion

The best grow lights for cannabis depend on several factors. Consider the size of your growing area, the number of plants you wish to grow, and your growing budget. Compare different lamps to get the best results according to your plant’s growth stage.

Also, consider the cost of maintaining your growing lights. Choose lamps that don’t require special maintenance and lamps with easily available parts from a local store or hardware shop.

Cheapest Indoor Grow Set Up for Cannabis

You may have heard about how costly it is to grow weed at home. This is why most people who use cannabis for recreation or medication simply buy their supplies from a dispensary. But for most people who want to grow their weed and want to explore new ways to make good quality cannabis, they say that you don’t really need to pay so much to do so.

If you came here for information about the cheapest indoor grow set up, then you won’t be disappointed. We have a few recommended affordable growing setups for growing weed at home. These are complete sets with all the things you need to start growing weed right away. 

We also have some of the best, highly-recommended growing equipment. These are affordable, easy to use, and perfect for people who are new to growing weed. All these prove that you don’t have to spend a fortune to grow the best-tasting weed at home.

Can Cannabis Grow in Any Growing Setup?

Cannabis plants are very hardy plants. These can grow in almost all environments, from rugged deserts to very cold regions of the planet. Somehow, cannabis plants were able to survive. Some plants adapted by reducing flowering times while some grow sparse leaves and stems so that all their energies are used to cultivate large and dense buds. 

If you’re skeptical about growing weed in a cheap setup, don’t worry. Many have done this before and have achieved good results. There are also first-time marijuana growers who have managed to grow medicinal cannabis using a cheap setup. We recommend using a simple weed growing setup if you’re new to growing cannabis so you can better monitor your plants.

And to get you started, here are some important things you need to consider when planning your cheap indoor setup.

What Your Cheapest Indoor Grow Set Up Needs

Since we’re talking about affordable, cheap setups, the following should be considered: 

Affordable Growing Room or Space

Before we head off to the different growing equipment that cannabis growers need to cultivate weed, let’s first check out an easy alternative called a grow box. 

A grow box is a small tight space where you can secretly grow weed. A grow box comes in different sizes with some measuring 48″ x 48″ x 80″ which can accommodate two, three plants with some only about 24″ x 24″ x 48″ which can hold only two plants.

What’s great about grow boxes is for $500 to $1000, you can have a complete setup ready for cannabis growing. Aside from the grow tent or grow cabinet structure, you also get pots, soil, lights, fans, gauges, and reflective material. All you need to do is to buy seeds or clones, and you’re ready to grow weed.

If you think that this is too expensive, you can settle for just the grow tent, which costs around $60 to $100 and buy all the equipment or recycle growing equipment instead. 

To give you an overview of some of the most affordable indoor growing setups, here are some good ones to consider: 

1. Ohuhu Grow Tent 

The Ohuhu grow tent is durable, very easy to use and assemble plus is constructed from 600D Oxford material. To keep your plants secure, durable zippers made of strong metal plus double-stitched tents are also in place.

This is a good grow tent because the material is tear-proof, waterproof, and will keep unwanted grow odors out. The size is 48″ x 48″ x 80″ and there’s another larger version with a 60″ x 60″ x 80″ dimensions. Inside the tent is 98% Mylar that keeps light and heat inside the tent. 

Assembly is easy with very sturdy frames that keep the tent in place.  It comes with labeled parts, so you won’t spend too much time in assembly. To keep the tent steady are rubber feet. And of course, all the provisions and opening for growing equipment are included.

You’ll find ducts, supports, ballasts, and openings for your ventilation, lighting, carbon filters, ducting hoses, and reflectors are available. It is ready for growing weed in hydroponics set up but also for growing weed in soil. 

2. MELON FARM Grow Tent 

This is another growing tent ONLY, an affordable option that comes with metal poles as well as connectors for extra durability. You don’t even need to use tools to assemble this tent. 

The material used as a tent is a 600D canvas cover with a handy observation window that will help you monitor your plants inside the tent—no need to open the door, which will only affect your balanced system. The cover is non-toxic, will never tear, and is double-stitched for durability. Inside is a Mylar lining that reflects light 100% back to your plants. 

Finally, this tent comes with handles so you can grip it firmly and hold it safely if you want to transfer your growing tent someplace else. You also get a special tool pocket inside the tent where you can securely keep your tools and other growing needs. Ventilation socks and electrical openings are also available for power cords to pass through with ease. 

And to give you more value for your money, you also get a 30-day money-back guarantee plus a 20-month manufacturer’s warranty for this indoor grow tent.  

3. LAGarden Hydroponics Indoor Grow Tent 

For less than $120, you’ll have this indoor growing tent that’s made from very durable 100% powerful reflective Diamond-Mylar fabric. It is not just for growing cannabis because you can also grow fruits, vegetables, herbs, and other exotic plants. 

The tent material is made from top quality strong 210D oxford cloth that’s lightproof and secure. You can grow your plants in secret with its efficient door and very strong zipper. You can also check on your plants with vents and windows. The tent is held with very strong metal frames; these are so strong that this can take around 88 to 176 pounds. 

This tent is purposely for cannabis plants. It comes with parts and provisions to hold lights and fans. It can accommodate lamps from 400W to 600W growing lights as well as stronger T5 lights to cultivate plants. It also has a lot of space for three or more small plants as well as other vital growing equipment.

4. Hellogrower Stealth Grow Box 

Hellogrower Stealth Grow Box is an indoor grow set that will work with soil and hydroponics growing. This comes with all the necessary equipment you need for basic marijuana growing. It comes with a 150W LED lamp, which is a powerful lighting system for a few plants. This LED lamp consumes only a small amount of power and gives off very low temperatures. Inside is 100%-reflective Mylar that will easily reflect light to your plants. 

This grow tent measures only 30″ x 15″ x 15″ and can accommodate two plants using deep-water culture hydro method. You also get other growing accessories and equipment like a bubble tub kit, 1.5- gallon tub, lids, net pots, Rockwool plugs, plastic tubing, air pumps, T connector, air stones, and hydro stone. 

You will have all the things you need to start growing weed; all you need to buy are marijuana seeds.   

5. Cash Crop 5.0 LED Hydroponics Grow Box 

Cash Crop 5.0 is a grow box perfect for hydroponics growing. It is a good option for people who have a limited budget. For less than $800, you will get basic growing equipment such as filters, fans, lights, nutrients, and pots. All you need to add are seeds.

Cash Crop 5.0 is easy to setup. If you need help, you can always contact their unlimited tech support by phone. This is a spacious hydroponics box that can grow up to 6 plants. You can choose a smaller version if you only have a small number of plants.

Anything Complete Below $100?

A very steep budget? Not a problem! You can grow cannabis with just the basics: 

  • 3-gallon containers at $4
  • A bag of organic potting soil mix at $7
  • CFL lamp with 125 watts at $60
  • A small fan at $30
  • An old cabinet (but clean!) with tin foil interiors

But the thing is, you reap what you sow with cannabis. With this cheap setup, you will only produce a meager amount of weed. But if you prefer to grow more, to produce larger and denser buds teeming with good yields, then you may need to pay more. 

Growing Room Needs

You can grow weed using the basic equipment, but we recommend you complete your setup so you’ll grow more. Indoor growing can be effective and can give you high yields as long as you can control everything in your growing area. 

Indoor growing will let you decide the humidity, lighting, ventilation, and the nutrients you give your plants. You can decide the exact amount of these factors according to what your plants need. With the cheapest indoor grow set up, you can evade external factors that can affect your success. This may be more expensive than outdoor growing, but many say it’s worth it.

  • All growing rooms must be lightproof – the room must be able to preserve light and should reflect light to your plants. Also, your growing room should prevent outdoor light from seeping through since you need a completely dark room to stimulate the flowering of regular plants. If you overlook this lighting schedule, your plants can revert to the vegetative stage and delay flowering and harvest time. You don’t necessarily have to pay so much for a lightproof room. As long as the room or cabinet is well-covered, then you won’t have any problems
  • All growing rooms should be airtight – some marijuana strains emit a very powerful odor, which can be a problem if you’re trying to hide your plants. As much as possible, the growing room, tent, or cabinet must have very tight doors to prevent the escape of these odors. Also, the only air escaping your growing area must be passing a carbon filter. As with maintaining a lightproof environment, you don’t need to spend too much money on keeping your growing area airtight. Just secure all the growing room walls, windows, and doors.
  • A good growing room must have an efficient air extractor system – this allows hot and humid air to escape the growing area. If this is overlooked, your plants will eventually wilt and die. A pair of fans, one fan for the outtake, and one for intake should do the trick for small growing rooms or tents, and these are not as expensive at all. But for larger growing areas, larger and more powerful fans and exhaust systems may need to be used.
  • A good growing room must be able to take in the fresh air – marijuana plants should have constant fresh carbon dioxide to create oxygen as well as sugars. 350 ppm of carbon dioxide can be used up easily, especially when you’re plants are inside a very small growing facility. Therefore, aside from having a proper air extraction system, you also need to have an efficient air delivery system to support your plants. And this does not have to be an expensive system. You can make it as simple as possible, made only from recycled or reused materials. 
  • A good growing room must have efficient heating, especially at night – if the lights are on, then there is a significant amount of heat inside the growing area. But when the lights are off, you need to consider adding heat to avoid freezing your plants. Again, this does not have to cost a lot. You 0can use affordable equipment or, better yet, use regular heating equipment in your homes like a heating pad or a lamp. 
  • A good indoor growing room should have an efficient air distribution system – aside from a system that takes fresh air in and removing stale or used air out, you must have an air distribution system that will move air inside the growing area. Take note that you need this to enhance CO2 distribution and to provide consistent temperatures. Now, this does not have to cost a lot of money, even a simple desk or wall fan will do. 
  • A good indoor growing area should have a waterproof floor – water can easily accumulate on the floor as you water your plants; therefore, the floor should be waterproof. It’s also a practice to spray water on the floor and walls to improve humidity, and thus, a waterproof floor is essential.  
  • A good indoor growing area must have efficient reflective walls – you can use simple, everyday household items to reflect light to your plants. This is important as you want to maximize every kilowatt of light you spend on your plants. Growers line the interior wall of their growing area with foil, Mylar sheets, glossy white paint, paper, or white linen. Again, reflective material does not have to be expensive.  You can use regular items instead.  

Cheap Grow Rooms, Tents or Cabinets

You have had the chance to check out a few of the most popular and affordable, grow tents and cabinets in the market earlier. If you think that these are still too expensive, we still have a few alternatives for you. 

Considering the previous guide on what a proper indoor growing set up should be, we came up with a few useful tips to create the cheapest setup. Consider the following:

  • Transform an unused room in your home into a growing space – instead of buying a grow tent or grow cabinet; you can turn an extra room or space to grow cannabis. Just remember to clean and tidy up and to use cleaning materials and equipment.
  • Use old furniture as growing cabinets – transform an old cabinet or armoire to a convenient growing space. No one will suspect that you’re growing weed when you hide you grow inside old furniture! And the best part of using furniture is the frame of your growing cabinet is secure; shelves may be present, and doors may be lockable for improved security.          
  • Use old home or office equipment as growing cabinets – use home equipment like old refrigerators, speakers, or ovens as makeshift growing cabinets. For office equipment, use old filing cabinets, lockers, pantry cabinets, and other hollow pieces of equipment as safe and secure growing areas for your weed. 
  • Make your own growing tent using simple and recycled equipment at home – if you don’t have old furniture or old equipment at home, you can use different items at home to construct a makeshift growing area. If you have pieces of wood or PVC tubing lying around, then you can construct a frame. Use a tarp as cover for your tent and voila, you have a growing tent! Make sure to secure everything with wire or screws. To make provisions for ducts and electric cords, cut just the right size opening. 
  • A space bucket anyone? –  a space bucket is a large 5-gallon bucket that is converted to a mini growing area. Stack 4 or more space buckets, and you’ll have a tall space bucket to accommodate one or two plants. You can attach a lamp to the cover, while PVC fans can be attached to the bucket walls. 

As you can see, you will hardly pay for any of these growing tents/cabinets. And of course, you’ll be doing Mother Nature a favor by reducing trash thrown in landfills.  

Cheap Grow Lights

Light is life to plants, so the more light you provide, the better plants will grow. Also, consider the formula 1 watt of light = 1 gram of yield, so basically, it’s not a good idea to be stingy if you want to harvest more. There are many kinds of grow lights, but if you want cheap, you must consider the following factors

  • Some lights/lamps are cheap to buy – CFL lamps are very cheap and are available almost anywhere. However, you need more CFL lamps to light to illuminate all the buds and all plant parts. This means you will still end up paying more for electric power consumed by several CFFL lamps. The same goes for HPS lamps, which are affordable and easy to purchase from a local hardware store. However, HPS lamps are the most powerful and consume more power. Thus, you’ll end up paying for more when you use this type of lamp. 
  • Some lights/lamps are cheap to use – LED lights are among the most expensive. However, you’ll save in the long run as these consume less power, will last longer, and are more efficient than CFL and HPS lamps. 
  • Some lights/lamps are cheap to set up – Lighting setups can also be expensive as you need to use safe and efficient lighting fixtures. You must ensure the safety of your lighting system; otherwise, you may end up with electrical problems. Consider safe electrical equipment and ask the help of a professional for electrical installations. 
  • Some lights/lamps are cheap to maintain – LED lamps may be more expensive than CFL and HPS but lasts longer than other lamps. Meanwhile, CFL lamps may burn faster than LEDs, but you can easily purchase replacement bulbs from any hardware or electrical shop. 

Cheap Growing Accessories (pots, nets and other hydroponics equipment)

Instead of buying new growing accessories like pots, nets, tubing, and containers, you can reuse or recycle items in your home. Just make sure that whatever things you want to reuse for your plants, these need to be clean and microbe-free. 

You can recycle clay or plastic pots, or you can reuse recyclable shopping bags as fabric bags. There’s no need to buy expensive hydroponics equipment too because you can recycle things you have at home. 

Growing Without Expensive Nutrients and Supplements

Fertilizers and supplements are expensive, especially the popular ones. But do you really need these expensive products to grow cannabis? Experts say that as long as you start your plants in good quality, pH-balanced soil, you’ll have no problems. Here are more tips to avoid paying too much for fertilizers and supplements. 

  • Start with healthy soil. Have your soil tested to check for pH, the presence of nutrients that cannabis plants need like nitrogen, potassium, and phosphorus as well as any toxins present.
  • Use homemade compost. Check out guides on how to make your own compost and apply this to your plants.
  • Use sandy-clayey soil because this soil aerates better, will absorb and drain excess nutrients and water, and are best for cannabis plants overall.
  • Plant non-finicky cannabis strains. Cannabis strains vary in many ways, and one of these is their ability to grow best in any environment. Some are okay with almost all types of soil and are forgiving with very little mistakes, while some are very finicky. Going with an easy strain reduces the need to deal with nutrient problems and other cannabis concerns. 

Some Important Tips

The cheapest indoor cannabis growth set up is basically something that requires less maintenance. Consider the following tips:

  • Grow only a few plants – it’s safe to say that when you grow only a few plants, you won’t have to spend a lot of money on plant food, electricity, pest control, and buying different supplies. The same goes for being the only one taking care of your plants. Don’t be too overwhelmed; grow the number of plants that you can afford to care for. 
  • Cultivate only a strain at a time – growing different strains means that you have to consider the needs of each one. Take note that every strain is unique, and you can end up being too overwhelmed. So, consider the strain you wish to grow or what is needed at the moment, such as a strain used as medicine rather than the strain that’s used for recreational purposes. 
  • Use autoflowering strains – automatic cannabis strains are those that won’t require a change in lighting schedule to flowerer. This is an easy growing strain that will flower on its own. Autoflowering cannabis also flowers quickly even as early as 7 to 9 weeks. With autoflowering strains, you’ll save time, money, and effort when you use this kind of strain.
  • Reuse growing equipment and supplies – if you have other plants in your garden, you can reuse old pots and other growing equipment. Just make sure to clean these first and to disinfect them before you sow your plants in. 
  • Invest in heavy-duty equipment and supplies – buying high quality growing equipment like lighting, fans, air coolers, and humidifiers can be very expensive, but if you’re a serious grower and want to enhance your growing skills, then it would be best to invest in good equipment. Read reviews, ask for good quality equipment from expert growers, and compare equipment and tools. This way, you’ll get the best value and your money’s worth.

Conclusion 

Yes, it’s possible to have the cheapest indoor grow set up, but consider all your growing needs and equipment before you settle with cheap items. Recycle and reuse equipment, growing areas, and growing tools. Always know your options so you will always get more value for your money. 

How To Make THC Vape Juice?

Now that you have managed to grow your weed, it’s time to do make your favorite THC juice. This is a guide on how to make THC vape juice at home. It’s easy to make your potent weed juice at home when you have proper materials and you know the steps on how to do it.  

What is THC Vape Juice?

Before we make vape juice, let’s first get to know what vape juice is and why many crave it. Vape juice is also called e-liquid or e-juice and is a combination of water, alcohol or nicotine, flavors, and vegetable glycerin or propylene glycol.  This delicious concoction was first introduced in the market when the first electronic cigarettes came out to replace regular cigarettes.  

Vape juice was initially referred to as a liquid that contains nicotine and was used to replace cigarettes by people who want to stop smoking. Therefore, if you want to refer to vaping as a way to stop smoking or as an alternative to smoking, use the term vape juice. But if you want to refer to vaping to get high then it’s THC vape juice.

THC vape juice is simply the same thing as vape juice. It’s made with alcohol or water, food-grade flavors, PG or VG, and the final touch: THC concentrate. This makes THC vape juice better for recreational or medicinal cannabis smokers.

Over the years, different forms of THC vape juice have sprouted in the market. But overall, these products may be classified into three: CO2 extraction, tinctures, and liquid THC. Another type of vape juice is a potent cannabis oil called Rick Simpson Oil (RSO). RSO is a very potent type of oil but you need to dilute it in water or oil before you add heat.

Why Do Smokers Vape Cannabis?

Many consumers prefer to consume THC vape juice because this is concentrated THC. THC vape juice effects are very similar to smoking a very high THC weed strain. First-time users and those with low tolerance to THC will experience the following side effects: disorientation to time and place, increased reception to stimuli, euphoria and extreme hunger, or the munchies.

Some people do not feel these effects at all or may only feel slight euphoria and hunger and can function after consumption. Also, the number of doses or takes will affect the high. A user who consumes THC vape juice for the first time may have the same effects as someone who’s taking consecutive doses.

 And because you’re taking very potent THC, you can benefit from the effects therapeutically. You may use THC vape juice to deal with conditions like chronic pain, nausea, vomiting, lack of appetite, depression, anxiety, and other medical and mental conditions.  

Side Effects of Consuming THC Vape Juice

Before you make your THC vape juice, it’s important to learn about the possible side effects of taking THC vape juice. Because this is potent cannabis you will experience the following adverse effects

  • Worst kind of anxiety
  • Paranoia
  • Unconsciousness
  • Vomiting

Never take THC vape juice or any other THC product unless you are in a safe place. Be sure to take a moderate dose and never go over your prescribed dose. And always have your finished product tested to determine the accurate amount of THC in your vape juice.

There are Three Ways to Make THC Vape Juice: 

Now that you know the advantages and some disadvantages of using THC vape juice and THC products, we can now focus on how to make vape juice.  Here are the three different methods explained in great detail.

1. Long Term THC Extraction Method

This THC vape juice extraction method makes use of Propylene Glycol or PG as well as Vegetable Glycerine or VG. This is the most time-consuming way to make vape juice but it’s one of the easiest to do. Most aspiring THC extracts makers prefer to use this extraction method because it’s a very straightforward process and guarantees you won’t make any mistakes.

 This process simply requires grinding your buds, “baking them” and mixing with the VG or PG. Let his mixture sit for at least three months. You may need to mix it now and then. Here are detailed instructions. 

What You Need to Make THC Vape Juice

  • ¼ ounce or 7 grams of cannabis flowers for 80ml of liquid
  • Vegetable Glycerin and Propylene Glycol mix
  • Pyrex tray or any regular baking tray
  • A  roll of aluminum foil
  • Glass jar with a secure airtight cover
  • Weed grinder
  • Cheesecloth
  • Freezer
  • Oven
  • Spatula
  • Syringe
  • A small bottle

Instructions

  1. First, decarb your weed. Set the oven to 250 degrees Fahrenheit or 121 degrees Celsius
  2. Grind your cannabis buds. Grind it coarsely but the bits should be even in size and shape.
  3. Spread the ground buds evenly in the tray. This allows cannabis buds to dry evenly.
  4. Cover the tray with foil. Fold the edges of the foil to the sides of the baking tray.
  5. Once the oven is ready, put the baking tray inside the oven.
  6. Take the PG and VG and mix these two ingredients in a jar or container. Mix these according to the percentage you like but we recommend half and half (50% VG and 50% PG). You may also increase PG slightly at 60% PG and make VG 40% because PG can bring out the natural flavor of weed.
  7. Remove the tray of cannabis from the oven and let this cool down on the counter.  Cooling down of the “baked” cannabis is very important in transforming a non-psychoactive THCa to the psychoactive THC.
  8. When the buds are cool, place these in the jar and add the PG and AG mixture until the ground buds have saturated. Ensure that there is enough mixture to cover all the ground cannabis.
  9. Stir the mixture and then cover. 
  10. Place this jar in a cool and dark cabinet or cupboard. This will sit for 3 months. Take the jar out and stir every 2 weeks. Add more PG and VG mixture if needed. 
  11. In the third month, take out the mixture and stir.
  12. Put the rice press over a glass jar. Place a few pieces of cheesecloth over the mouth of the rice press. 
  13. Pour the mixture in the rice press. Cover this with another cheesecloth and then squeeze. the mixture will pour in the jar and will produce clean juice.
  14. Test the potency of your mixture by vaping it. Use a syringe and take a small amount, enough to fill a bottle. Add a small amount inside the electronic cigarette and smoke it. Label the bottle accordingly.

2. Short Term THC Extraction Method

This THC vape juice recipe also contains VG and PG but you can make this in just 3 hours. This is faster than the first method because heat is used to extract THC from the PG and VG mixture. People who can’t wait three months and won’t buy expensive rosin presses often use this short term THC extraction process.

Things You’ll Need for this Method

  •  ¼ ounce or 7 grams of cannabis flowers for 80ml of liquid
  • Vegetable Glycerin and Propylene Glycol mix
  • Pyrex tray or any regular baking tray
  • A  roll of aluminum foil
  • Glass jar with a secure airtight cover
  • Weed grinder
  • Cheesecloth
  • Water
  • Freezer
  • Oven
  • Stovetop
  • 2 pots or a double-broiler
  • Spatula
  • Syringe
  • Cooking thermometer
  • A small bottle

Instructions

  1. Decarb your weed by baking it slowly in 250 degrees Fahrenheit or 121 degrees Celsius. After decarbing, let the tray of cannabis on your counter.
  2. Take the PG and VG and place these two ingredients in a container. Mix these according to the percentage you like or a half and half (50% VG and 50% PG). Try PG at 60% PG and VG 40% because PG can enhance the natural flavor of weed.
  3. When the buds are cool, place these in the jar and add the PG and AG mixture until the ground buds have saturated. Make sure that there is enough mixture to cover all the ground cannabis.
  4. Place water in the bigger pot. The water must be at least 1-inch deep. 
  5. Place water in the second pot and place this inside the smaller pot.
  6. Place the pot on the stove and heat it until you reach 220 degrees Fahrenheit. Use your thermometer to monitor the temperature accurately. Maintain a constant temperature of 220 degrees Fahrenheit.
  7. Place the jar of cannabis and PG-AG mixture in the small jar. Let the mixture heat up to 180 degrees Fahrenheit or 85 degrees Celsius. 
  8. Once you have achieved this temperature, maintain this using your thermometer. Do not let this go over or else it may destroy all the THC. Take note that this is a very important step to help the THC bind with the PG and VG without degrading its quality. 
  9. Once the temperature of the mixture has reached 180 degrees Fahrenheit, allow the jar to remain cooking for an hour. Some concentrate makers recommend extending this for two, three, or four hours for enhanced potency. But as long as you’re able to keep the mixture at a safe temperature, you can extend up to many hours if you wish.
  10. Use a spatula to mix the contents of the jar. You may add more PG and VG mixture in the cannabis if it seems dry. But add just the right amount, not too much because this can make your mixture weaker. 
  11. Once you are satisfied with the consistency of the mixture, remove the jar from the pot and place it on a cool counter or tabletop. Let the mixture cool completely.
  12. Use the rice press and line this with layers of cheesecloth. 
  13. Place the cheesecloth over a jar or container and pour the weed and PG-VG mixture in the press. Let this pass through the cloth to strain the liquid. 
  14. Let the juice pass through. When the liquid has stopped flowing, take another piece of cheesecloth and place it over the rest and remove it from the bowl and squeeze it hard to get all the concentrate into the container.
  15. Take a syringe and take a small amount of the concentrate to fill a small glass jar. Cover and label the jar.
  16. Test the THC vape juice you just made. Fill your electronic cigarette with your homemade THC vape juice and smoke it.  Note the flavor, aroma, effects, and any adverse effects.

3. Rosin Extraction Method

Making THC vape oil using a rosin press is one of the most effective. It is also the quickest especially when you’re ready with the needed concentrates. If you don’t you need to use a Rosin Press or you can use homemade equipment like a pair of straighteners you use to tame hair. 

The goal is to extract Rosin wax that can be added to an electronic cigarette juice to create THC vape juice. With this method, you will extract rosin wax most efficiently and quickly.

Materials You Need

  • Cannabis flowers or rosin. Select only compact nugs as these work well with rosin presses.
  • A rosin press or an updated hair straightener
  • Pyrex glass or beaker
  • A few pieces of parchment paper
  • Non-GMO wax liquidizer 100% Natural Organic Food Grade Medical Terpenes
  • A tool to stir the mixture

Instructions

If you don’t have a rosin press, consider these steps

  1. Hold the cannabis buds and pack these in small bundles. The size must be enough to place in the rosin press or inside a hair straightener. 
  2. Once the packed weed is ready, power on the press or the straighteners. 

The best temperature to press the nugs is from 250 to 280 degrees Fahrenheit or around 120 to 140 degrees Celsius. It’s hard to determine if you have the correct temperature when you’re using hair straighteners so use a thermometer. 

  1. To press your weed properly. Place the weed inside a piece of parchment paper and fold the paper over. Place the piece of paper in the center part of the hot plate. Press and squeeze with the straightener for approximately five seconds. After the allotted time, remove from the plates and let the rosin and paper remain in a cool and dry area. Repeat the process until you get up to 0.5 grams of rosin. 
  2. Place the rosin inside the parchment paper in a cold area like in your freezer for just a minute. When the rosin is hard, you can easily remove this from the parchment paper. Use a dab tool or chopsticks to remove the rosin. This is easy to do because when you have a small amount on your tool, the rest will easily follow or collect easily. 
  3. Place one ml Medical Terpenes in the glass vial and add the 0.5 grams of rosin. But if you want to make more just follow the formula: 1 ml for every 0.5 grams of rosin. 
  4. Heat the Medical Terpenes and rosin mixture by using a hot water bath. 

Boil a small kettle of water. Add hot water in a bowl and place the glass container in the middle. The rosin will slowly mix with the Medical Terpenes to create a liquid with a golden color and smooth texture.

  1. Collect a small amount and place it in your e-cigarette. Smoke this to test your homemade THC vape juice. When all’s good, fill a small bottle with the precious oil.

Some Ways to Preserve Freshly-made THC Vape Juice

You can keep your freshly-made juice in a small glass preferably in small amber glasses with a tight lid. This will protect the contents from degradation. Commercially-prepared vape oils are mostly inside amber or dark glass bottles, the kind used in keeping medicines and supplements. A medicine dropper cap will allow you to conveniently dose up when you’re ready to vape.

Remember the following when storing your precious vape juice

Avoid keeping your vape juice near hot surfaces. Concentrate makers agree that 70 degrees Fahrenheit is the best temperature to keep vape oil bottles and cartridges. Keeping these in high temperatures will only degrade the liquid and affect the taste, aroma, and potency. Also, some cartridges may leak because of the high heat.

Never keep oils and vape juices near sunlight or in an area where there’s direct sunlight like near a window or ledge. Sunlight can degrade liquid and oil quality. This has the same effect on flower quality. When oils are exposed to light, it turns darker and will reduce its potency. It won’t be too long when the oils become no more than just regular oil.

You can keep vape liquids in a cold room but not inside the fridge or freezer. Moisture can accumulate inside the cartridge or bottle and this can cause mold and mildew. Keep vape juice in a dark cupboard or cabinet away from light and moisture to preserve the oil’s natural properties.

Store bottles and vape cartridges upright and never on the side because oils tend to leak. Can you still smoke dark vape juice oils? Yes, you can still smoke oils and vape juices that have turned darker because the darkening is simply the effects of oxidation. However, you’ll notice that the juice is less potent and the taste and aroma will not be as good as fresh oil. The potency may not be as high but is not too low as to have no effects. However, this oil remains good for consumption. 

As long as THC vape juice is properly preserved, this can last for many years. It will retain its potency, color, taste, and flavor, just like the day you made it.   

Ways to Smoke THC Vape Juice 

The only way to smoke THC vape juice is by using a vaporizer or a vape pen. You can buy one from a local vaping store or an online supplier. Avoid improvising to stay safe.

Is it Legal to Consume THC Vape Juice?

It’s hard to tell if THC vape juice is legal or not especially when you’re from the US. The best way to find out is to access marijuana laws in your area. Some states allow the use of medical marijuana only while some regulate the use of recreational and medicinal cannabis.

If you’re in a state where recreational cannabis is legal and you are old enough to buy cannabis then you may purchase vape juice from a dispensary or online shop. If you live in a state where only medical marijuana is regulated then you need to visit a doctor to get a prescription before you can buy THC vape juice products and vaping equipment. 

It is also possible that in states and countries where marijuana is legal, residents can make their THC vape juice at home. But to be on the safe side, check local marijuana laws before cooking bottles of vape juices in your kitchen.

All About Safety When Making THC Vape Juice

Whenever you’re working with heat or flame, be sure to have a fire extinguisher ready. Use a rosin press, hair straightener, and stoves in a well-ventilated room. Always wear appropriate attire when “cooking” your THC vape juice.

Use safety equipment. Don’t rely on faulty and questionable equipment in making vape juice. Always, wash equipment and utensils before use. Bottles used to store vape juice should be cleaned and sterilized before placing oil or vape juice in.

If you’re purchasing new equipment like a rosin press or a vaporizer, buy only from reputable dealers and suppliers. Check for safety and always read reviews. If you have a vape pen or e-cigarette, you may use this as long as the device is working properly.

Now that you know how to make THC vape juice, you may want to consider making concentrates and oils using different strains. The process is the same for all types and strains of cannabis. And of course, the quality of the flower you’re using matters a lot. Buy only well-preserved, high-quality weed from experts. You may also grow your weed to ensure you’re using safe and organic cannabis. 

List of Cannabis Deficiencies: How to Prevent & Cure Them

Cannabis plants are similar to other types of plants as these are not immune to nutrient deficiencies. And as an aspiring expert cannabis grower, you must understand and prevent the many different nutrient deficiencies in cannabis plants and know how to cure in the event of any kind of problem. 

Take note that to be able to grow healthy plants with good yields, you must learn how to diagnose simple cannabis deficiencies. Here are a few of the most common nutrient problems that cannabis growers encounter. 

What are Cannabis Nutrient Deficiencies?

Cannabis plants require a certain amount of nutrients to survive. If their nutrient needs are not met, this can result in a nutrient deficiency. 

Nutrients can be divided into macronutrients and supporting nutrients. Macronutrients are Nitrogen, Potassium, and Phosphorus. These three come in varying amounts and are needed in varying amounts as well. Meanwhile, supporting nutrients are available in minimal amounts but are nonetheless important in cannabis plants’ regular functions. 

A deficiency is present when a nutrient is in small amounts. Meanwhile, toxicity is when the nutrient is present in large amounts. Both a deficiency and toxicity are bad for your plants. Your cannabis plants may end up with poor growth and low yields when any of these nutrients are overlooked.

What Causes Cannabis Deficiencies?

There are different causes of nutrient deficiencies, consider the following:

  • Improper use of fertilizers and supplements – the most common culprit in nutrient deficiencies is the incorrect use of fertilizer and supplement. Failure to read and understand directions on how to apply the fertilizer product can lead to severe supplement problems. Using incorrect fertilizer according to the growth phase of the plant is a common problem. 
  •  Cannabis plants have two major growth phases: the growing or vegetative phase and the flowering or the blooming phase. Plants need fertilizer with higher amounts of nitrogen than potassium or phosphorus during the growing phase while during the blooming phase, plants require higher potassium than phosphorus to help buds grow larger and denser. Forgetting this number one rule can easily affect your plants’  growth.

 Also, consider how the fertilizer or supplement is applied to plants or soil. Not following simple instructions could affect the life of your plants. 

Nutrient lock in the roots and soil – a condition is known as nutrient lock may affect the way your plants take in nutrients. Nutrient lock happens when there is an excess nutrient that settles in the soil or the roots. This nutrient or mineral can block nutrients from being absorbed causing the nutrients to pool in the roots and plants.

  • Nutrient toxicity leads to nutrient deficiency – similar to how to root lock or nutrient lock develops in the roots, when a nutrient is present in toxic amounts, the plant is unable to take in some nutrients. There must be a balance in the plant’s metabolic system otherwise, it may not be able to utilize the supplement or nutrients you are giving it. 
  • Unhealthy soil – in some cases, the soil used to grow cannabis may not be good enough to use. Acidic soils may affect the way some nutrients are absorbed. Some soils may be too compact like loamy soil and thus, this won’t be able to absorb fertilizer and nutrients and this leads to deficiencies. Also, soils that are too loose like sandy soil or soil with more sand content may not be able to hold nutrients. 

List of the Most Common Nutrient Deficiencies, their Cure and Prevention Tips

Here is a list of some of the most nutrients and their corresponding ways on how to deal with their deficiencies. 

Macronutrients

The three macronutrients are the foundation of your cannabis plants. Having a healthy balance of these nutrients gives your plants a fighting chance of growing larger and denser plants. And with all problems that marijuana plants encounter, the soon you find out about it, the easier you can keep your plants healthy and have a higher chance of a good harvest. 

Nitrogen 

Nitrogen is a very important nutrient in plant growth and is widely used therefore it’s not so surprising that it’s easy for plants to develop nitrogen problems. This macronutrient is used in various processes including the manufacture of amino acids needed for plant growth and development as well as chlorophyll as plant food. 

With nitrogen, your plants can grow taller, develop more leaves, stems, and roots and can prepare for the growth of larger and denser buds. As you can see, with less nitrogen, all these processes will be affected. Your plants will remain small and with sparse leaves. Adult plants will not be able to develop good and strong parts to hold buds for the flowering stage and there is also a possibility of delayed blooming time. 

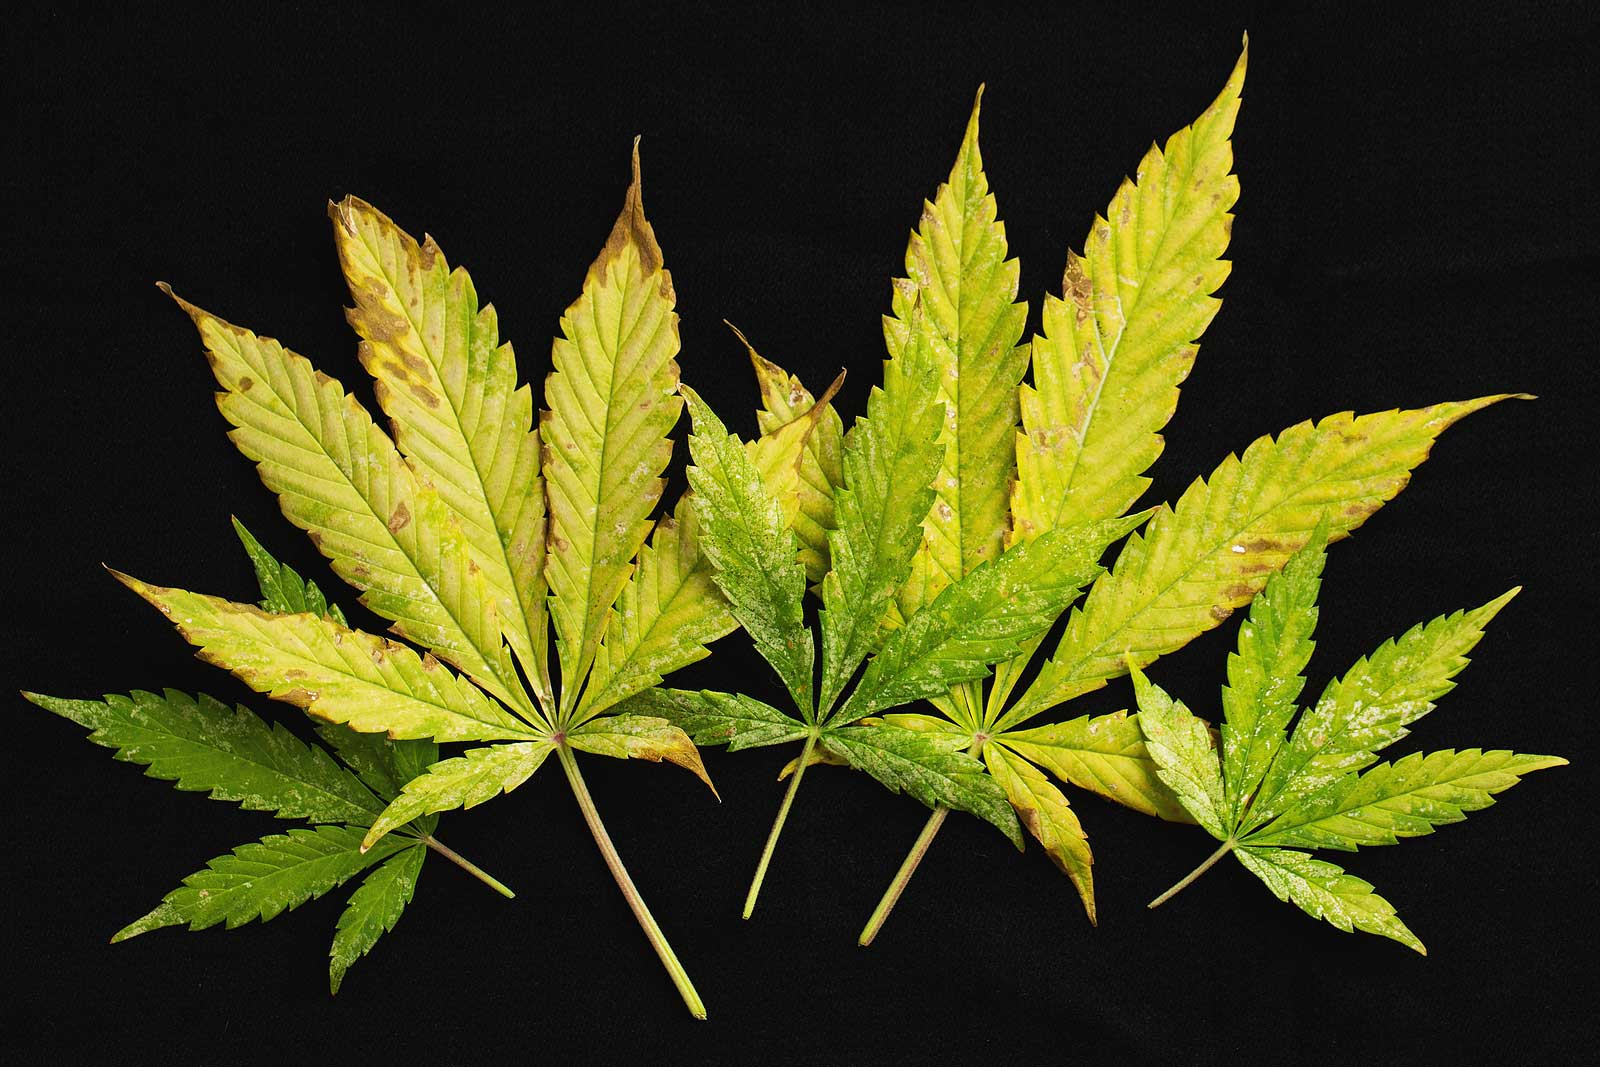
Nitrogen deficiency symptoms

  • Changes in the older leaves from the base to the middle part of the plant
  • Yellow leaves
  • Yellow leaves can wither and die
  • Yellowing and withering can progress to the top, new and healthy leaves
  • Even after the deficiency is solved, the yellow leaves won’t return to their green color

Nitrogen deficiency treatments

Treatment should be done ASAP otherwise, it may be too late. You must find a way to naturally increase nitrogen and the following can help.

  • Use natural supplements with high nitrogen amounts like blood meal, dried blood, bat guano or bat manure, cottonseed meal, fish meal, worm castings, and many more.  
  • Use fertilizer with correct amounts of NPK. Take note that plants need higher amounts of nitrogen during the vegetative stage. 
  • The test pH level of soil and correct if there are any problems.

You can tell that your plants are recovering when the yellowing of the leaves has not progressed. The yellow leaves will soon wilt and die but new and green leaves will take their place.

Phosphorus

Phosphorus deficiencies are more common in hydroponic systems than in soil-grown plants because the soil is known to have high amounts of phosphorus.

This nutrient is responsible for the growth of roots and for boosting the strength of leaves and stems during the vegetative stage. It prepares the plants in growing large and dense buds. Phosphorus also helps in the germination of seedlings and is very important during the flowering phase.

If there is a phosphorus deficiency during the flowering phase, your plants will grow smaller buds and thus you’ll have smaller yields. 

Phosphorus deficiency symptoms

Check for the following symptoms:

  • Plants will slow down their growth and will look very frail.
  • The foliage is darkening.
  • Leaf edges will change from green to brown and will start to curl inwards.
  • The petioles will become dark sometimes turning from green to blue or reddish.
  • Symptoms appear during the coldest days because it’s during this time when cannabis plants are having a hard time absorbing phosphorus stored in the soil. This can also occur when the soil is too wet or moist and in soil that’s too alkaline.

Phosphorus deficiency treatments

The following may be used to treat phosphorus deficiency

  • Use fertilizer with higher phosphorus content. Apply this especially during colder climates. Take note that as long as the phosphorus ratio is higher than 5 then you can use the product to correct phosphorus deficiency.
  • Use organic materials to solve phosphorus deficiencies: use bat guano, an organic material with high amounts of phosphorus.
  • Use only water-soluble fertilizers for maximum effectiveness.
  • Use all-purpose plant supplements like Miracle-Gro but use only half of the recommended dose. Using more can kill your plants.
  • Use other organic materials like worm castings, bone meal, and bat guano. Crab shells also work but these are expensive.

As with nitrogen and potassium, the effects of your treatment are noticeable after a week. The affected leaves will never recover and return to its regular form and color but new leaves will soon replace these. You will also notice that the symptoms of a phosphorus deficiency have ceased which means your plants are on the road to recovery.

Potassium

Low levels of potassium are quite common when it comes to growing cannabis plants. This happens because, in most fertilizer products, it has the lowest ratios compared to most macronutrients.s 

But just like nitrogen and phosphorus, this nutrient is very important in the growth, health, and development of cannabis plants. Potassium is necessary for water respiration, an important process in plants. It is also a nutrient that’s important in a plant’s natural resistance to different diseases. 

Potassium is also vital during photosynthesis as the plant makes food for his use. Also, potassium is helpful in water circulation. It helps water move through the plant which is necessary for the vegetative and flowering phases. 

Potassium deficiency symptoms

You may find potassium deficiency symptoms rather unusual but you should treat your plants the moment you notice the first signs of potassium deficiency.  

  • Your plants will grow taller faster and will look healthy except for the lower part of the plant.
  • The lower leaves turn brown and die. The leaves may seem to have burnt edges and tips.
  • Your plants will soon slow down its growth, especially the leaves.
  • Mature leaves will appear yellow and mottled in between the veins but soon, the entire leaf will be affected.
  • Some leaves may also become completely yellow and soon die. 
  • Delayed flowering phase and very poor yields.
  • Irregular growth in some areas

Potassium deficiency treatments

Despite all the weird and irregular symptoms of potassium deficiency, there’s good news. This is one of the easiest nutrient deficiencies to correct. Remember the following

  • Use a fertilizer that has more potassium compared to the one you’ve used before.
  • Adjust the fertilizer you are using before by adding a water-based or water-soluble potassium. 
  • You may also use organic substances like wooden ashes, granite dust, kelp meal, or try sulfate of potash. 

Results your efforts can be readily seen after a week. Same to nitrogen and phosphorus deficiencies, the affected plant parts will never return to their previous states. But you can tell that the treatments are working if the symptoms have ceased. 

Other nutrients

Magnesium

Magnesium is necessary for the development of strong and healthy plants.  Cannabis plants need this nutrient for vein health and the creation of new leaves. Magnesium is utilized for producing chlorophyll.

It is rare for outdoor growers to encounter magnesium deficiencies because it’s a very common nutrient in the soil. This is usually a common occurrence in hydroponic systems. The deficiency starts at the lowest parts of the plant leading to the loss of many leaves. This is why you must deal with magnesium deficiencies right away.

Magnesium tends to move around the body of the plant therefore the symptoms vary and can be seen on different parts of the plant. This is the reason why magnesium deficiency can show up at the bottom of the plant especially on the older leaves causing theses to die. 

In severe cases, magnesium deficiency can move up from the bottom leaves to the top of the crown of the plant. This element is vital for the plant’s food manufacturing so don’t overlook early signs.

Magnesium deficiency symptoms

In magnesium deficiency, the symptoms start at the bottom of the plant. Remember the following:

  • Lower leaves begin to yellow and will soon show chlorosis.
  • Leaves will curl inward and will soon fall and die. 
  • Leaf outline will become dry and very brittle.
  • Soon, growing shoots will become light green and then become white.
  • The petioles and the stems will turn purple.
  • Red stems may also be seen but this is uncommon 

Magnesium deficiency treatments

Treat magnesium deficiency as soon as possible with any of the following:

  • Use plant booster products with high levels of Magnesium. Read labels well and apply the correct dose.
  • Use organic products to cure magnesium deficiency: dolomite lime, Epsom salts, worm castings, garden lime, or magnesium sulfate. We recommend using Epsom salt or Magnesium sulfate since these are water-soluble. Epsom salts are best for hydroponic systems. 
  • To use Epsom salts use a ratio of a gallon of water: a teaspoon of Epsom salts. 
  • Use Calcium- Magnesium product or Cal-Mag. This is a trusted Magnesium and Calcium corrector that is available in most cannabis growing supplies shop. 
  • Correct root pH. Incorrect pH can lead to poor absorption of nutrients. Keeping the correct root and soil pH can help prevent the occurrence of any deficiency. Also, adding magnesium supplements to roots or soil with incorrect pH won’t do any good. The nutrient will simply stay in the soil and this can affect the absorption of other nutrients. Remember, when you’re growing in soil root pH should be from 6.0 to 7.0 and when you’re growing in hydro, root pH of 6.0 to 6.5 is needed for efficient Magnesium absorption.
  • Flush your system with clean, pH-balanced water. Flushing will help remove nutrient salts which may affect your plant’s ability to absorb Magnesium and other nutrients. Also, this can help improve pH and maintain pH correctly.

It can take a week for magnesium treatments to completely work. Expect that the affected plant parts will never recover but new growth will eventually appear to replace these old growths. 

Boron

Boron deficiency is rare. However, the first sign of boron deficiency should be treated right away. This deficiency is mostly due to the absence of this nutrient in the soil or in the fertilizer or supplement that you use. It is also possible that some nutrients present in high amounts in the roots are affecting the absorption of boron. But despite being a minor nutrient, boron deficiency can also affect the growth of cannabis plants.

Boron deficiency symptoms

You’ll notice the following in plants with boron deficiency:

  • Tips of leaves change color from green to brown or gray.
  • There is slow growth.
  • There are small dead spots that may be isolated in some parts of the plant but may also be scattered in different areas.

Boron deficiency treatments

Fix boron deficiency right away to avoid damaging effects to plants. 

  • Adjust root and soil pH since incorrect pH can lead to poor absorption of boron and other minerals.
  • Use boric acid. This can help fix boron deficiencies and is the most common treatment used by cannabis growers.
  • Use compost or organic materials as these may also contain substantial amounts of boron.

You will know that your boron deficiency treatment is working when the symptoms are not progressing. The damaged leaves will not return to their regular appearance but new, green, and strong leaves will soon grow. Depending on the treatment you used, it can take days to a week before your plants can recover.

Calcium

Calcium deficiencies are common in cannabis plants grown indoors in hydroponic systems. It is also a common deficiency in areas where calcium is not added to local water irrigation systems. If you are using a hydroponic system and adding nutrients to water in your reservoir solution then you may be forgetting a good calcium source. Also, incorrect soil and root pH can lead to calcium deficiency. Overlooked calcium deficiency can lead to frail plants, poor growth, and reduced yields.

Calcium deficiency symptoms

You’ll find the following in plants with calcium deficiency:

  • Symptoms begin on the older leaves
  • The presence of big dead blotches on very dark leaves.
  • Very weak branches that easily break.
  • Overlooked symptoms can lead to root problems
  • Poor growth and possible poor yields

Calcium deficiency treatments

Thankfully, calcium deficiency is very easy to treat. Just use any of the following.

  • Use lime to correct calcium deficiency. Follow the directions as to how to use lime products to get positive results.
  • Use Cal-Mag, a calcium and magnesium product that effectively corrects calcium levels without harming your plants.
  • Correct pH levels of soil or the roots because any incorrect reading can affect the absorption of calcium and other minerals.

You can tell that the calcium treatment that you used is working when the symptoms of calcium deficiency are no longer progressing. However, the leaves and stems/branches affected will never return to their previous appearance. 

Copper

Copper deficiencies are very uncommon but overlooked copper deficiency can lead to poor growth and poor new growth of leaves. Despite being a minor nutrient, copper is needed by plants to grow, make food, and to create dense and big buds. 

Copper deficiency symptoms

The following is present in plants with copper deficiency:

  • New leaves start to wilt and die.
  • Leaves appear brownish, blue, or gray at the tips.
  • New growth like leaves, stems, and flowers will look very frail.  

Copper deficiency treatments

Here are a few practical ways to treat copper deficiency:

  • Use fertilizer products rich in copper. 
  • You’ll find products like fungicides which have higher copper amounts.
  • Fix incorrect pH amounts to ensure the proper absorption of copper and other minerals

The affected parts will never return to their previous states and will only wilt and die. You will only be able to tell if the treatment you’re using is working when the symptoms are no longer progressing.

Iron

Iron deficiency in cannabis plants can be seen in new growths most especially the leaves. Therefore, the upper leaves are most affected and are usually discolored. The symptoms of iron and manganese deficiencies may look the same but iron deficiencies affect new growths.

You must correct iron deficiencies right away because these may affect the growth of your plants and can also reduce yields. Take note that iron plays a huge role in chlorophyll production in cannabis plants.                                                                                                                                                                                    

Iron deficiency symptoms

Check for the following symptoms of iron deficiency:

  • Upper/newer leaves will change color from green to yellow.
  • The new leaves will change to yellow but the veins will remain green.
  • Plants will look very weak and sickly, yields will be affected.

Iron deficiency treatments

Consider the following when correcting iron deficiency: 

  • Fix incorrect pH levels in the soil and roots. Incorrect pH levels can lead to poor absorption of nutrients such as iron. 
  • Iron deficiencies usually occur when there are manganese and zinc deficiency.  Treat these conditions alongside iron deficiencies.

Once iron treatments have been provided, it takes only a few days for your plants to recover. You can tell that your plants are slowly recovering as the symptoms are no longer progressing. Sadly, the affected parts will never return to their previous condition. New growths will soon replace these affected parts. 

Manganese

Manganese deficiency is uncommon and will usually occur together with zinc and iron deficiencies. This mineral is needed in food production in plants as it is vital for chlorophyll and in the creation of nitrates. Take note that too much manganese can lead to iron deficiency. 

Manganese deficiency symptoms

You should notice the following when your plants are suffering from manganese deficiency:

  • Symptoms are common in new plant growth most especially in the leaves.
  • Leaves will have dead spots which will soon turn yellow. 
  • Plants will appear weak and may have slow growth.

Manganese deficiency treatments

Consider the following when treating manganeses deficiency in cannabis plants:

  • Use manganese in the water-soluble form to correct deficiencies.
  • Use compost or a product known as greensand to help correct manganese deficiencies.
  • Improve soil and root pH because these often lead to poor absorption of nutrients like manganese.

Correct manganese treatments will work in a few days and you can tell that your plants are recovering when the symptoms of the deficiency are no longer progressing. The affected parts will never recover. New healthy growth will only replace them.   

Molybdenum

It is uncommon to have molybdenum deficiencies in cannabis plants but this can happen whether you’re growing your plants in soil or hydroponics. Only a very small amount of this nutrient is needed to support the growth and development of plants but the absence or very low amounts of molybdenum can cause devastating effects to plants. 

Molybdenum deficiency symptoms

You’ll find the following symptoms in cannabis plants with molybdenum deficiency:

  • Symptoms concentrate on the new leaves or foliage.
  • The middle leaves turn yellow and new leaves will become warped and will stop growing.
  • The shoots curl inwards.
  • The leaves will change color from green to red especially along the lips.
  • The plants will have slow growth and will have diminished yields.      

Molybdenum deficiency treatments

Treat molybdenum deficiency with the following techniques:

  • Use molybdenum supplements. Use only half of the amount recommended since cannabis plants need only a small amount of this nutrient.
  • Use sprays or molybdenum-infused solutions to treat this kind of deficiency
  • Check soil and root pH since incorrect pH can lead to poor molybdenum absorption as well as other nutrients.

You can tell that molybdenum treatments are working when the deficiency symptoms are not progressing. The affected plant parts will never return to their previous appearance but will simply wilt and fall from the plant.

Silicon

Silicon deficiencies are often found in indoor hydroponic systems this is because this nutrient is abundant in nature. Silicon is needed in plant production and development and thus, deficiencies can lead to poor plant growth and development. It is also needed in the natural pest control properties of cannabis. You will soon  notice that pests are more plentiful 

Silicon deficiency symptoms

You can tell that your cannabis plants lack silicon when you notice the following:

  • The presence of insects/pests. All kinds of pests attack your plants compared to other plants you have in your garden.
  • Weak stems and branches. 
  • Poor growth and poor yields

Silicon deficiency treatments

Silicon deficiency is very rare in plants therefore you should be cautious in applying a treatment. Always check for the presence of other nutrient deficiencies or causes before suspecting silicon deficiency. 

Silicon deficiency is treated by any of the following:

  • Use silicon supplements. Follow instructions carefully and be sure to give only the required amount.
  • Liquid silicon is always the best formula so it can move through plant roots easily.
  • Diatomaceous earth
  • Pest control products to control pests that can ruin your plants and your yields. 
  • Check and correct root and soil pH. Sometimes silicon and other nutrients cannot move through the roots because of incorrect pH. 

After providing proper silicon treatments, it can take a week for your plants to recover. You can tell that the treatment you used is working if you find that the symptoms are not progressing. The affected leaves and stems will never recover however new and healthy ones will take their place.

Sulfur

Sulfur deficiency is very rare because most fertilizers have adequate amounts of sulfur. But sometimes, the poor absorption of other minerals and incorrect pH can affect the absorption of sulfur. 

This nutrient is important to many cannabis plant’s vital processes such as food manufacturing, growth of the root system, and overall development.

Sulfur deficiency symptoms

You can tell that your plants have a sulfur deficiency when you find the following symptoms:

  • Yellowing of the new stems and leaves 
  • Narrower and brittle new leaves
  • Stunted plant growth
  • Poor yields

Sulfur deficiency treatments

Take note of the following sulfur deficiency treatments:

  • Use potassium sulfate
  • Use Epsom salts
  • Correct root or soil pH to allow nutrients to be absorbed by plants

When sulfur deficiency treatments are applied correctly, it can take days for your plants to recover. Don’t expect an instant fix. You will notice that the symptoms are not progressing and this means that you have successfully overcome this problem.

Also, the affected leaves and stems will never return to their previous appearance. New and perfect foliage will simply grow to take their place.

Zinc

Cannabis plants require very small amounts of zinc but most of the time, zinc deficiencies occur. This can happen during the growing phase of the flowering phase as well. Usually, zinc deficiencies can occur together with iron and manganese deficiency.

Cannabis plants need zinc to support many plant processes such as the development and creation of different enzymes. 

Zinc deficiency symptoms

You can tell that your plants have zinc deficiency when  you spot these symptoms:

  • Twisted foliage 
  • Veins of older leaves turning yellow 
  • Soon, the plant loses color and become pale
  • Small buds with very poor yields
  • Buds could become deformed or curl inwards
  • Wilted stems, weak stems that break

Zinc deficiency treatments

Consider the following treatments when treating zinc deficiencies:

  • Check for other deficiencies like manganese and iron deficiencies and treat these as well.
  • Check the pH of roots and soil. Some nutrients cannot cross the roots because of incorrect pH.

Be careful in trying to apply zinc supplements because plants need only a small amount of this nutrient. As with all nutrient deficiencies, it can take days before your plants recover from zinc deficiency. The affected stems and leaves won’t recover but new foliage will surely grow to replace the diseased ones. 

  • Water-based or water-soluble potassium. 
  • You may also use organic substances like wooden ashes, granite dust, kelp meal, or try sulfate of potash. 
  • Results your efforts can be readily seen after a week. Same to nitrogen and phosphorus deficiencies, the affected plant parts will never return to their previous states. But you can tell that the treatments are working if the symptoms have ceased. 

Conclusion

Cannabis deficiencies happen in indoor or outdoor growing areas. You must prevent and take extra care when applying fertilizer or supplements and never overlook any kind of symptoms no matter how minimal it may be. Cure nutrient deficiency to help your plants achieve good health and good yields. 

Pruning Cannabis: An Ultimate Guide

All weed growers are looking for healthy plants and better yields. There are many ways to achieve these like feeding your plants the right nutrients, using correct lighting, and growing in the best soil but there is one thing that experts prefer to use and this is all about pruning cannabis.  

You may have used this technique in growing other plants before as pruning can boost growth and yields of vegetables, fruits, and even flowering plants. In pruning cannabis, it’s the same thing.  

With pruning, you can control unruly plants and at the same time improve yields. We will discuss these in more detail as we check out the correct ways of pruning cannabis plants.  

What is pruning? 

Pruning is cutting the overgrowth parts of plants. Usually, the large fan leaves are removed to improve airflow through the plant’s canopy. It’s also possible to remove smaller leaves and stem to maximize the growth and development of the buds during flowering time.  

Some cannabis growers who use a hydroponic system also prune the roots. This is done to improve nutrient absorption and to avoid root rot. 

Pruning cannabis is not recommended for beginners because there is a tendency for first-time growers to overdo pruning. Also, think about cannabis as very sensitive plants. These plants may only suffer from stress if you’re not careful. Stress can be very damaging to cannabis plants as this can affect growing and flowering. Stress can even lead to the development of hermaphrodite plants. 

In short, pruning needs time to learn and to get accustomed to. You need years of practice. Having many years of experience pruning other types of plants can also prepare you when it comes to pruning cannabis plants.  

Why prune your plants?  

Pruning has many advantages to cannabis plants. The following are just among the few.  

Pruning cannabis can control overgrowth 

The most common reason why growers prune is to control plant growth. Usually, Cannabis sativa plants are pruned to control their wild growth. When sativas are left to their own devices these plants can grow taller than 10 feet!  Cannabis indica plants also need pruning. Although these plants can only grow as high as 3 to 4 feet, these can become very bushy and too dense which can lead to moisture build-up inside the plant canopy. Pruning can make a compact plant neater and promotes better form.  

Pruning can help boost yields  

Pruning opens up dense plant sections to reveal immature buds. With enough lighting, you can improve the size of these buds and thus you can enhance your harvest many times.  And by cutting overgrown plant parts you can greatly reduce your plants’ chance of developing molds and pests. You can reduce moisture and humidity so you can avoid mold growth entirely. 

Pruning can prevent mold and mildew 

As mentioned earlier, removing large fan leaves and another overgrowth allows air to move through the canopy and dry up moisture. With no moisture, you can greatly reduce mold and mildew which depend on moisture and dampness to develop. 

Pruning can deal with pests 

Aside from being a psychoactive component of weed, THC or tetrahydrocannabinol also has pest control properties. THC can drive away common pests like spider mites, aphids, caterpillars and crickets.  THC can be improved by pruning. Cannabis plants don’t have enough THC until these reach their third month in the vegetative stage. Plants develop more THC to protect themselves from leaf-eating pests that start being active during this time.  

Pruning cannabis improves lighting, 

humidity and air circulation Since pruning removed large fan leaves, light can penetrate in the plant canopy better. Removing large leaves will also reduce moisture and this will enhance humidity levels which plants need to live healthily.  Finally, removing large fan leaves will also help air to pass through. And the air in slow steady movements can strengthen the soft stems and branches of cannabis plants.  

Pruning can improve overall plant health 

Pruning cannabis can greatly enhance plant health. You can prevent pests, avoid moisture, and improve lighting which greatly helps plants’ manufacture their food. All these can  Pruning improves THC production  

Things you’ll need to prune your plants Now that you know the advantages of pruning let’s prepare for this activity with the following tools 

  • Sharp cutting tool – we recommend a pair of sharp scissors or a sterile blade. 
  • The plant you need to prune – we will discuss how to select the pruning candidate later 
  • Adequate lighting – you need adequate lighting so you can safely and correctly prune your plants.  
  • Container – any kind of container will do as long as this can hold all the cuttings. You can save these plant parts to grow clone plants. 
  • Water – if you want to reuse the cuttings, place them in a container of bottled water.  
  • You don’t have to buy new supplies because you can reuse your old ones. But make sure to clean and sterilize scissors, blades, and cutters.  

Why maintain a clean and sterile environment? If you use dirty or unsanitary tools to cut your plants, your plants risk contacting cannabis plant diseases and molds. 

How to prune your cannabis plants? 

Pruning may sound very straightforward but there’s so much to it aside from just cutting overgrowth. Follow these simple steps to make pruning faster and more efficient.  

1. Prepare the plant you will prune – select the plant/ plants you want to prune. Separate these plants from the others and place these on top of a table at eye-level. This position will allow you to get a closer look at your plants better and cut or prune your plants safely.  

2. Prepare your pruning tools – sterilize your cutting tools by first brushing it with soap and water and applying 70% isopropyl alcohol. If you’re using new blades or knives there’s no need to prepare these. Make sure your tools are sharp as they are clean and sterile. Also, prepare lamps/ lighting as well as containers and water if you wish to use the cuttings as clones.  

3. Cut… – don’t pick the leaves and stems with your hand because doing so can damage the cut tips and stress your plants. Take the stem or leaf with one hand and the cutting tool in the other hand. Make a swift diagonal (slanted cut) on the part. This cut exposes a larger surface area for water and nutrients to easily move through. This is very beneficial in case you want to use these parts for cloning. Remember, a swift and clean cut will do it.  

4. Save cuttings for growing clones – the cuttings can be used to grow another plant, a cloned plant. Clones skip the germination and seedling phase but these need to grow a good set of roots and strong stems. Place the cuttings in a container with water immediately after you cut these from the mother plant. Reuse these cuttings ASAP.  

5. Water your plants – right after pruning, give your plants clean pH- balanced water. This will replenish lost moisture and prevent stress and shock.  

Expert pruning techniques 

A lot of successful growers make use of special pruning techniques to enhance bud growth here are some of them: 

Topping  

This is one of the most common pruning techniques as this can improve bud size, increase yields, and improve plant shape. 

Topping is done by cleanly cutting just below the bud site. Doing so will yield two bud sites. As the two bud sites become more prominent, you must carefully separate the two with the use of some pegs and threadWhen 

As you can see, topping can greatly enhance the yield of cannabis plants and would be great for strains that have low yields. Topping can be done over and over again to increase the number of bud sites.  

When is the best time to start topping? We recommend that you start topping as soon as your plants are strong enough. When you’re using clones, the earlier the better.  

When using seedlings, wait till the young plant has developed 4 to 5 internodes. The plants should grow strong roots. Just wait till the roots are larger and stronger before you prune. 

The topping should be done cautiously because overdoing it or having no prior training or knowledge about topping could be dangerous. Cannabis plants are very sensitive plants and cutting or pruning these plants can bring too much stress and this stress can lead to poor growth and development. We recommend only an expert perform topping or practice well before you use this technique on your cannabis plants.  

Fimming  

Fimming is similar to topping as it can enhance yields. But the difference is that fimming cuts directly under the bud site resulting in four different growing nodes.  

Fimming is much more delicate and a lot more stressful to plants and therefore you need to do this skillfully and very carefully. And similar to topping, we don’t recommend this for beginners.  

Just to describe what happens in fimming, you need to cut directly under the bud site. Make a sharp and swift cut to create four different nodes. Wait a few hours and these nodes will become more prominent and will soon be ready for training. Use small pegs and some thread to tie the four nodes and separate them. Do this very carefully.  

Fimming may be done unlimitedly and you can start after your young plants have developed 4 to 5 internodes. Wait till the young plant has developed strong roots before fimming.  

 Conclusion

Pruning cannabis must be done as soon as the plant is strong enough but do this cautiously. When you prune your plants well, you can expect better plant health and enhanced yields.

Growing Weed in California: What You Need to Know

Have you ever wanted to know how growing weed in California is done? Yes, it is legal to use, buy, and grow cannabis in California thanks to their updated medical marijuana program. Take note that it’s not always about regulations in California; there is also some important cannabis growing etiquette to remember.

Basic cannabis growing rules in California 

If you live in California, you are allowed to legally grow six marijuana plants in your residence. You may use all the harvests coming from the six plants that you own either for recreation or for medicinal purposes. 

The minimum age to use, buy, and grow marijuana is 21 years old. 

21 years old is also the age when alcohol is permitted. If you want to purchase cannabis, seeds, and other related products, you must show an identification card that indicates your age. To receive packages related to cannabis, you must also present your ID.

For underage medical cannabis users, a prescription is needed. Parents or caregivers of the patient should be the one to buy medical cannabis used for treatment.  

The grower must have no more than six cannabis plants in his residence.

To clarify this rule, the six plants are regardless of their growing phase. California does not allow growers to have plants that are already flowering.

Limiting the number of plants to grow is likely because of the environmental impact of the widespread growing of cannabis at home. There are concerns that home growers will increase and affect the water supply in the area. 

Some argue that having six plants is not enough, but many say that this is indeed too much for a single grower. Six plants can produce yields that can last you a year! As long as you follow your plant’s growing needs, and use special growing techniques, you’ll surely be good to go.

An individual who wishes to grow cannabis can only cultivate in his own home.

He must be responsible for his plants, lock it and keep it so that no one may see it.

Cannabis growing is a privilege in California and should be done in private. You must still be mindful of where you are because despite cannabis being openly accepted in California, not everyone is for it. 

You must also be careful since it is not allowed to grow weed near schools, parks, public areas, and libraries. If you live in a residential building like a condominium unit, check if this is allowed or permitted by your landlord or building manager. If this is not allowed, then you may be penalized or may be kicked out of the premises. It’s best to ask about these first beforehand. 

An individual may take with him no more 28.5 grams of weed. Any extra amount should be left at home.

Remember these numbers: 285 because you can grow as many smokable and usable weed from your 6 plants. You can use different methods like training, pruning, trimming, and using different supplements to increase your yields. 

However, you cannot bring all of your yields with you, just the amount ofg28.5 grams. You may choose to give this amount away, but you may only carry with you an ounce at a time. 

It’s best to invest in a handy, durable scale so you will have no problem carrying the correct amount of dry weed. 

Outdoor growing is not allowed; only indoor growing is permitted.

Cultivating cannabis is your right, but take note that some areas and towns in California are still prohibiting growing. If you are located in these areas, consider growing your weed stealthily because you might be reported to if you are not careful. 

The new California cannabis law allows you to grow cannabis indoors. Cities and towns will not be able to keep you from growing your weed. If you rent your home, inquire about special laws from your landlord, and if there’s no rule regarding it, keep your growing area hidden and personal, and you won’t have to worry. 

Any problems with the law regarding cannabis use, possession, and growing may be consulted with a cannabis lawyer. 

About growing medical cannabis in California

Discussing growing weed in California won’t be complete unless you learn about growing, use, and carrying medical marijuana in California.

People with medical cards will not be required to pay sales taxes if they need to buy retail weed. This started in 2018. Since this rule was passed, people who need medical cannabis started to flock dispensaries, and this has led to a shortage of medical cannabis products. 

Therefore, we recommend that you grow your own medical cannabis supply if you use medical weed strains. Before this law, California had a popular medical marijuana program, and most resident patients grew their own medical weed at home. 

The current program has been approved for the use of cannabis for the treatment of cancer, HIV/AIDS, migraines, glaucoma, epilepsy, MS, chronic pains, arthritis, migraines, and cachexia. 

Before you can grow medical cannabis, and before you can take medical cannabis, you must talk to a doctor regarding your condition. If you don’t know a doctor that can help you regarding medical marijuana, you can find one at CANORML website. 

Also, check the growing rules for medical and recreational marijuana in your area before you grow your plants. 

  • There’s no need to have a medical marijuana card to grow medical cannabis in California.
  • But you can still register to get the card. Patients are encouraged to register from their state.
  • But if you want to remain anonymous, you can register from your doctor or from non-profit organizations.  
  • Medical marijuana cards will provide proof that you’re using medical marijuana, but it won’t be able to prevent authorities from arresting you or taking excess weed from you.

Improvements/ changes in medical marijuana growing laws

  • Some areas made it illegal to grow or may have designated a limit to the number of plants to grow. This is because they assumed that medical cannabis growers might grow as much weed as they want!
  • But for most parts of California, medical cannabis growers were allowed to grow their supply as long as they have permission from their doctor.

NEVER DO THIS IN CALIFORNIA

As a grower in CA, you should never sell your homegrown weed. If you sell your weed to anyone, you might be sued by the family or the employer of the individual. But if you want to sell your weed, do so through appropriate markets or channels. This can help you make your growing to legal marijuana growing business. 

The rules regarding growing cannabis in California has evolved over the years. It’s best to check the rules time and again because newer and better regulations are being approved. Stay out of trouble and subscribe to local cannabis growing news. 

Also, keep your growing activity in secret. If you want to sell your weed and you believe that these are the best, do so legally. And if you are a visitor, good news, California marijuana use, buying, and possession also apply to you, but you are not allowed to grow your weed. 

Buy high quality marijuana seeds only from reputable companies and not from black market shops and sellers. 

How to Grow Bigger Buds Outdoors

Are you wondering how to grow bigger buds outdoors? Every cannabis grower knows that there’s a huge difference between indoor and outdoor growing. Most agree that it’s a bit difficult to cultivate good yields outdoors because of so many unpredictable factors. 

Take the weather, for instance. You might be aiming for cannabis plants with huge buds when a storm starts to brew head on! And there’s the presence of pests. You could be looking forward to dense and fat buds when some caterpillars decide to eat your plants for lunch!

But you don’t need to worry. There are ways to boost yields and grow bigger and denser buds even if you are growing your cannabis plants outdoors. Check out these techniques:

Sow your seeds in spring

Every plant has a life cycle, and with marijuana plants, these will grow taller in spring and during the first half of the summer months. Right after the summer solstice, the female cannabis plants will grow less as it will use up all its energy in making flowers. 

Take note that springtime happens at different times in different places around the world. In South Africa and Australia, springtime is in October while in the USA and Germany; this season is during the late weeks of March. 

Prune your cannabis plants

Pruning can help cannabis plants create larger buds. Although it seems counterproductive, this actually works. You see, more buds that are found downwards in your plant the further these buds are from the canopy. Also, these buds get less light and hence, will grow very small, underdeveloped buds. Most of the lights provided by the lamp, no matter how strong the lamp may be, are blocked by the plant’s canopy.

So how to start pruning? Here are some tips. 

Prepare your materials.

Use sharp scissors, blade, or knife to prune your plants. Never use old, worn out or dirty scissors or knives. As much as possible, use sterile/clean equipment as your plants’ health is at stake. 

Locate the parts to be removed

Remove the large fan leaves first. These are leaves located at the bottom part of the canopy. If the plant is too big, cut higher to free up space. 

Remove the parts

With the part on your other hand and the tool on the other, make a fast and quick cut. If you want to reuse the part, make a diagonal cut. 

Keep the parts

If you wish to use the parts as clones, place these in water. If you need to use the clones ASAP, use cloning powder or gel. Dip the cut tips in cloning gel or powder and then place these in a peat pellet. One clone stem is to one peat pellet. 

When to prune? Pruning should start once the plant is too bushy or too compact. It depends on the strain you are growing. Some strains tend to grow more compact as time goes by, while some remain lanky and sparse. Take note that pruning is done not just to improve the appearance of plants but to reduce the possibility of mold growth and development. Molds can be very devastating to your plants, especially during the flowering phase. 

The right nutrients to make bigger buds

Cannabis plants require three major nutrients: N or nitrogen, K or potassium, and P for phosphorous. N is needed during the vegetative stage, while the P and K are during the flowering stage. 

P will help buds develop and turn to denser and tighter structures. If you are growing your plants in soil, add worm castings or guano, which will enhance P levels. You may also use a special concoction called compost tea during flowering. Compost tea can enhance mycelium numbers in the soil. This will ensure that your plants will get a higher amount of nutrients.

Consider the following tips when providing correct nutrients to your plants

Use only commercially-prepared nutrients. 

These are tested, safe, and are ready to give you’re your cannabis plants. Using homemade concoctions may not be safe, with quantities of nutrients are not measured. With commercially-prepared products, all the nutrients are considered, measured, and at the right amounts, ready for your plants to consume.

Choose a fertilizer that’s right for your plant’s growing phase. 

There are two growing phases of cannabis plants: the vegetative phase and the flowering phase. During the vegetative phase, your plants are actively growing and thus will need more nitrogen than other nutrients. 

Nitrogen is important in growing stronger and healthier stems, branches, and leaves. It is also a nutrient essential to plants to make food. Therefore, fertilizer products during the vegetative stage have more nitrogen, so your plants will grow better during this crucial stage. But during the flowering phase, it’s a different thing. Plants don’t need nitrogen but instead need more phosphorous and potassium instead. These nutrients will help grow larger and denser buds, and thus, a fertilizer that has more P and K and less N is needed. 

Read the instructions carefully. 

Most fertilizer products are simply mixed in water and then applied to plants like when you’re watering them. But there are some new fertilizer products that are used differently. Therefore, read product labels and understand how much to use, when to use, and how often to use the fertilizer or supplement. Only when you understand this will you be able to grow larger buds outdoors. 

Monitor post-feeding

There’s more to it than just feeding or applying your fertilizer product to your marijuana plants. You must continue monitoring your plants accordingly. This is especially true when you’re using a new fertilizer product. 

First, take note of the amount of feeding and the time. Consider the frequency of the application and your plants’ response. Check out any of these signs:

  • Good response, plants appear livelier, taller, with good color and overall appearance.
  • Check for any problems, including nutrient deficiencies or nutrient overload. Usually, nutrient problem signs are changes in the color of the leaf and leaf textures and changes in the stem and branch colors, etc. 

At the first sign of any problem, discontinue the fertilizer and flush the soil with clean and pH-neutral water.

Give compost teas

Compost teas are used to boost plant health and should be given at least once to plants to grow larger buds. Some growers use compost tea as a remedy to plants that recently had stress problems, nutrient deficiencies, overwatering, or under-watering problems.

To give compost teas, use the compost material, place in a cheesecloth, and then brewed in a small pail. Air is pumped in the pail using a small air pump with an air stone. This tea is left to brew at least a day and then given to your plants. Monitor your plants right after application. 

How to grow bigger buds outdoors – the light plays a crucial role

Light is very important in any grow setting. If you want bigger buds when you grow outdoors, your plants must get the best growing conditions like correct temperature and humidity from the start. These should also receive correct lighting schedules in a day. 

Outdoor growing is susceptible to weather. But when you’re growing buds indoors, you can do so much from the start to enhance bud growth. The light intensity of the grow lights is a huge part of your lighting factor. The more intense the lamp, the thicker or, the bushier your plants will grow. Plants that are skinny, lanky, and weak don’t receive much light. 

To improve light intensity, move your grow lights closer so that the light is on top of your plants for the most growth. But what about outdoor plants? You can do the following:

  • Plant your cannabis in pots so you can move them around the garden. Place the plants directly under the sun to get the most light. Move the plants back to a shaded area in your garden if it starts to rain, or it’s too hot for your plants to be exposed. 
  • Grow your plants in a greenhouse, so you don’t need to move them around. A greenhouse is still an outdoor growing area with a lightweight structure covering your plants. 
  • Follow correct lighting schedules 

Photoperiod cannabis strains require a different growing schedule than other strains. This is because these should be exposed to a 12-hour light and 12-hour dark schedule to bloom. But right after this schedule, continue placing your plants in full 12-hour light by taking the pots directly under bright sunlight. 

Grow in healthy soils

To guarantee bigger buds when growing weed outdoors, plant your weed in the best growing medium. If you want to grow in soil, start with healthy, organic soil.

Your garden soil may already be healthy if plants nearby are growing well, but of course, cannabis plants have different growing needs. To find out if your soil is healthy, test it out. Use a special soil testing home kit to check for the pH, nutrients, and any dangerous metals or toxins in the soil. The ideal pH is neutral at 6.6, while nutrients that should be present are the basic N, P, and K as well as other micronutrients like calcium, magnesium, zinc, iron, and many more. There must be no dangerous metals present or anything that can hurt your plants. 

If your soil is not healthy or there are dangerous materials present, you may use commercially-prepared soil preparations instead. You can use soil with perlite or vermiculite, which aerates better and can hold water and fertilizer and can drain the excess as well. 

For best growth and good bud size and yields, grow your plants in a sandy loamy soil. This is soil that has the mentioned characteristics plus is available in most garden shops. Place this type of soil in large growing pots, preferably 5 to 10-gallon pots. You don’t need to add perlite or vermiculite for this soil because it is already well aerated. 

The growing pots also play a huge role in growing healthy, high-yielding plants. Large pots should be used from germination till harvest time. Growing in small party cups and transferring to a larger pot or directly in the ground will stress your plants, and this may affect its ability to produce bigger buds.

Prevent pests and molds

Pests and molds can strike unexpectedly and are very common in plants grown outdoors. The best way to deal with pests and molds is to prevent them. Here are a few ways to do it

  • Trim or prune your plants, remove the large fan leaves to improve airflow inside the plant canopy. This will prevent mold and mildew growth.
  • Keep the outdoor area, the surrounding area clean and dirt free. Throw away the trash, cover trash cans, and keep tools away to avoid attracting pests.
  • Use garden-friendly bugs like ladybugs to eat pesky pests like aphids and spider mites. You can buy ready to use ladybugs in packs, and all you need to do is to place these all over your outdoor growing area. 
  • If snails and slugs are present in your outdoor garden, stop these from eating your plants by placing dishes with beer. Apparently, snails and slugs are a sucker for beer, and they will drown themselves in it. 
  • Be diligent and check every leaf and underside of your plants for molds and pests. Act quickly when you spot one because surely there will be plenty more around. 

Start with good genes

To increase your chances of growing large buds, start with seeds of cannabis strains that are known to grow large and dense buds. We recommend the following strains for your outdoor growing area:

  • Critical Kush
  • Critical Mass
  • Industrial Plant
  • Monster
  • Sweet Moby
  • Big Bud
  • Brian Berry Cough
  • Big Foot

Consider the growing needs of the cannabis strain you want to grow. Get to know if the strain fits an outdoor growing area and if it needs direct sunlight. Some weed strains are perfect outdoors but require indirect sunlight. By understanding all these, you will now know how to grow bigger buds outdoors

How Much Weed Does One Plant Produce?

One of the most common questions that first-time cannabis growers ask is, “How much weed does one plant produce?” This question is usually followed by what they can do to enhance their yields? 

Unfortunately, there’s no easy answer to this question because there are many factors that affect cannabis plant yield. We will discuss what you can expect when it comes to yield according to these different factors. We can assure you that you’ll be able to answer this question after you have read this simple guide. 

Cannabis yields when growing indoors 

This guide will divide yield prediction into two major topics: indoor and outdoor yields. This is because it’s very obvious that indoor growing is completely different from outdoor growing despite cultivating the same plants. 

When it comes to cultivating your plants indoors, using the right kind of lighting is very important. People who have grown cannabis before can grow plants that can produce around a gram of weed/watt of light.

Therefore, a 400-watt of high-intensity sodium growing lamp can produce 400 grams of yield. This is 400 grams or 14 ounces of dried and usable weed, ready to smoke. Also, a grow lamp that has 1200 watts can give you 1.2 kg. or 42 ounces of weed. 

These could only mean that investing in the right kind of lighting equipment will give you the best results when combined with the best airflow and using correct nutrients as well as other important growing factors. Also, make sure that your indoor plants have enough space to grow for these to produce good yields. 

Indoor growing in soil

Growing in soil is common in an indoor setup. You may get a lesser amount of yield in soil compared to growing in a hydroponic setup. This is because hydroponic growers are able to have complete control of the nutrients or supplements needed by plants. 

But despite this, indoor growers still prefer soil than hydro because it is easier to do. Also, soil growing mediums can help create some kind of buffer or cushion for any error since it holds nutrients. There is always room for any mistakes when growing cannabis in soil.

Therefore, an estimate would be around a gram of yield per watt when growing in soil indoors. Again, this means using a 400-watt growing lamp will give you around 400 grams of weed or 14 ounces.  

Indoor growing in hydro

Now that you know how much you can get when growing weed indoors in soil, hydroponic growing is a lot different. You can get up to 20% better yields as long as you follow growing in hydro closely, and you monitor your plants well. 

You must be very keen on keeping correct TDS and pH levels because your plants’ roots are found in water. Any kind of mistake or incorrect level can result in drastic mistakes. Consider that even a very small mistake in hydro can cause a lot of problems for your plants. But people who are able to manage their setup better will be rewarded with amazing yields. 

You can possibly get around 1.2 grams of usable weed per watt of light. This means that a 600-watt HPS light can provide up to 720 grams of usable weed or more than 25 ounces. 

Some high-yielding strains to grow indoors

There is indeed a very stark difference when you consider an indoor or outdoor grow and in plants grown in soil or hydro, but most of the time, you need to consider the strain or the kind of plant to grow. It’s useless to push for higher growth and harvest when you are cultivating a low-yielding strain.

We have a few of the best strains to grow indoors because of their high yields. 

  • Big Bud – Big Bud is one of the most satisfying cannabis strains to grow because it can give you high amounts of usable weed. Big Bud is an indica-leaning strain that’s easy to grow and high yields.  This strain can provide a full-body experience. It also comes with a very earthy and fruity aroma and smell.
  • GSC Extreme – Girl Scout Cookies is one of the most productive plants and is 80% indica and 20% sativa. You can get a lot of yields whether you’re growing this plant indoors or outdoors. You will feel very relaxed with a good high. GSC can give you a relaxed and euphoric high.
  • Blue Dream – being 80% sativa, Blue Dream is one of the most potent and high-yielding strains in the market. This strain offers an easy-growing effect with THC as much as 21%.n Blue Dream is a consistent plant with very lovely buds. 

Cannabis yields when growing outdoors

Now we learn about the amount of yield an outdoor cannabis plant can produce. When you grow in the best growing conditions, you may get as much as 500 grams of yield or about 17.5 ounces of yield per plant. 

Take note that space is very important, with plants getting at least two meters of space to get the best yield. Also, other factors to consider are the presence of pests and diseases, the amount and type of nutrients you will use, and the environmental temperatures. Growing containers also play a huge role. When you grow plants inside pots or containers, the pots must be around 50 liters or about 15 gallons. 

When sowing seeds in an outdoor growing area, germinate the seeds first to help your plants grow larger. Also, germinate these indoors so you can easily manage temperature and humidity levels. If you follow all the growing needs closely, you can get as much as 500 grams of usable weed for every plant. 

And similar to growing cannabis indoors, the genetics of the plant also plays a huge role. Starting with strains with the best genetics count a lot. 

Can you predict your yield before you grow your plants?

You don’t have to worry about the amount of yield of your cannabis plant because you can use simple weed plant calculators found online. One such efficient calculator is the one from Yield-O-Rama, where you can input the type of light, light intensity, or lumen and the level of experience you have as a grower. This calculator will help you find out or make an approximate value of your yields in no time.

How much weed does one plant produce – dry weed vs. wet weed

Getting the right amount of yield does not end after harvest time. There’s a huge difference between dry and wet cannabis. It’s very important to dry your weed very slowly at an average of 10 to 14 days inside a dark and climate-controlled area. Your drying area must have a temperature of 64 degrees to get more weed.

Keep in mind that you can get as much as 20 to 25% of weed after the drying process, and this may also depend on the type of strain, the density of the bids, and the drying method you are using. You must weigh only the wet buds and never weigh the entire plant. 

So considering all these factors, you can get as much as 20% to 22% of dry weed from a sativa and around 22% to 25% from an indica. Meanwhile, you can get only 12.5% when you use the entire cannabis plant when the weed is still wet. This includes the leaves, stems, and all other plant parts when the plant is still wet. 

Some tips to improve yields

Now that you have a clear idea of what to expect when it comes to yields, consider the following tips: 

Grow fewer plants

It seems a bit odd that to get more yields is to grow fewer plants. This is important, especially when you grow plants indoors under strong lighting. If you’re only growing four plants, then you can get more yields compared to growing eight or sixteen plants under every growing lamp.

So decide how many plants you wish to grow before you even start sowing your seeds. 

Keep in mind that if you already have four plants, then you can get 25% less of your yields in case one of your plants die or becomes diseased. 

Consider that four plants are much easier to monitor and manage compared to more plants. And in case cannabis growing is not legal in your area, you will only be caught with only four plants in our possession!

Use the Screen of Green (SCROG) method

SCROG is one of the most common low stress techniques and is used by many growers because it can increase your yields easier. SCROG is all about topping your cannabis plants and putting a screen at around 15 inches at the top of your plants. As the branches grow 4 inches and moves through the screen, tie it down in a horizontal pattern. Continue placing the branches in the same position until you have managed to create a screen or blanket on the top of your plants. The SCROG method is preferred by growers because there’s no light wasted; the thick screen or blanket prevents the light from being wasted. 

With the SCROG method, all the plants are the same height, and thus every plant receives the same amount of light. You can even bring your lamp closer to the blanket as long as the temperature does not go above 77 degrees Fahrenheit. And with the SCROG, you’ll get dense and solid buds, no fluffy ones that contain more air than weed. Take note that fluffy buds are no good because these don’t ripen. 

Most growers who have used the SCROG have managed to improve their yields up to 20%!  

Use the best type of light

Now we come to another important factor in understanding the number of yields. Yes, the type of light makes a huge difference when it comes to lamps, the intensity, and the type of light matters. 

Does a 600-watt HPS lamp yield less than a 1000-watt HPS lamp? A 1000-watt lamp will create more light, but a plant will not be able to use up all this energy. It will need CO2 to do this. 

Around 350 to 400 ppm of carbon dioxide is found in the air, and indoor cannabis plants will utilize this CO2 with energy from light to make sugars. In a closed room with no air circulation, plants will use CO2 in just an hour and thus will have slower sugar creation due to low CO2 levels. This is the reason why an indoor growing area should be well-ventilated. 

When the room is pumped with 350 to 400 ppm of carbon dioxide will not be able to make more sugars compared to the light coming from the 600 watts lamp. The yield won’t be higher even if you use a 1000-watt bulb HPS in normal situations. 

But if the carbon dioxide levels are increased, your plants will require more light, and therefore a 1000-watt lamp can nearly double the yield! Therefore, a 1000-watt lamp is a good investment if you want more yields as long as you use it properly.  

LED lamp yields

You may be wondering if LED lamps are good at making more yields. LED is bright but not as intense as HID or HPS lamps, but the key is the light spectrum. There is a certain color of light that can help produce more yield, and LEDs are available in different colors. Also, LEDs do not produce too much heat, and thus it won’t be a burden to your plants. 

Big yields in a small growing area

People who still want to grow more yields despite cultivating plants in a small area can try other techniques. They can use SCROGGING, trimming, and pruning to control the growth of their plants.  So, how much weed does one plant produce?  The yield that your plants produce depends on many factors, and thus, it is very difficult to mention a nice round number. Take extra care of your plants to get the most yields. Start with the best strains and modify your growing area to meet your needs.